Tyrants of the Underdark is a game that has not exactly slipped under my radar – but one I’ve kind of ignored over the years for absolutely no good reason. Now that I’ve got a gaming group that is big enough to do it justice I hunted down a copy. It’s a mix of area control and deck building – neither of which are ground breaking these days but it’s how the ingredients come together that matters.
Anyway I spent a day or so building some inserts to better house the sleeved cards and the player components. Tyrants has an almost egregiously oversized box – no doubt to showcase the drow on the cover, so much so that I considered creating a dummy insert to reduce the overall form factor. I didn’t in the end and I’m really happy with the end result!
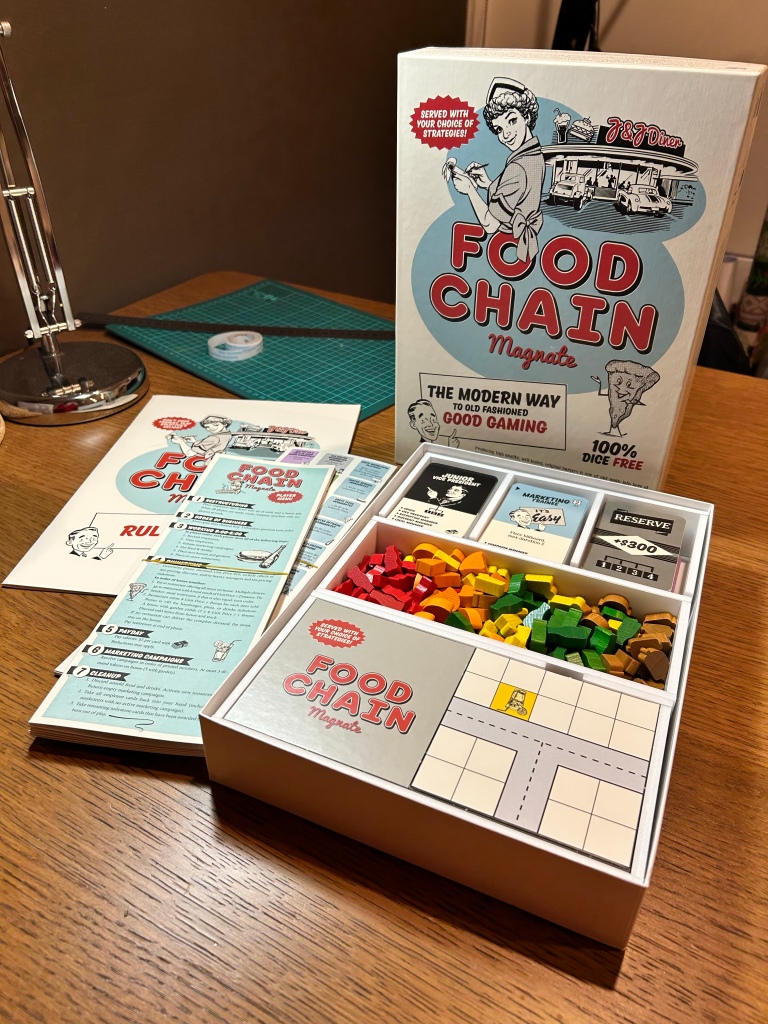
It’s been a while since I painted anything, and while I do play in Warhammer Underworlds events semi-regularly I also have a four person board game group that plays ‘heavy’ games regularly. The group began out of a shared desire to play more Dune Imperium, but it has graduated on to other games, such as Root, Brass Birmingham and now Food Chain Magnate.
Many board games these days come with well designed inserts to hold the components safely and also provide convenient storage for distribution while playing. There’s a cottage industry that creates third party inserts as well, for those that like to pimp theirs – off the shelf.
Me however – having a game box with components sloshing around is a perfect opportunity to create a foam core insert, and I’m very happy with the result here.
All you need is: a pencil and some paper, a steel ruler, a craft knife with a sharp blade a cutting board, some PVA glue, a crappy brush and the foam-core (I used 5mm thickness) that you can find at a hobby or stationery store -and a healthy dose of obsessive attention-to-detail (may require neurodiversity!).
I firstly measured and recorded the dimensions of the interior of the box (the bottom bit, not the lid) and spent some time arranging the various components efficiently as possible – with two considerations: The cards needed to have enough space to be sleeved and still accessible and the various food items needed to have functional storage while playing.
I then measured everything up (accounting for the thickness of the foam-core) and space for the rules and player aids sitting on top – and cut everything out.
I then used slightly watered down PVA that I brushed on to the edges, and glued it all together.
The job took about four hours from concept to completion, and it was really satisfying to see it all fit nicely together.
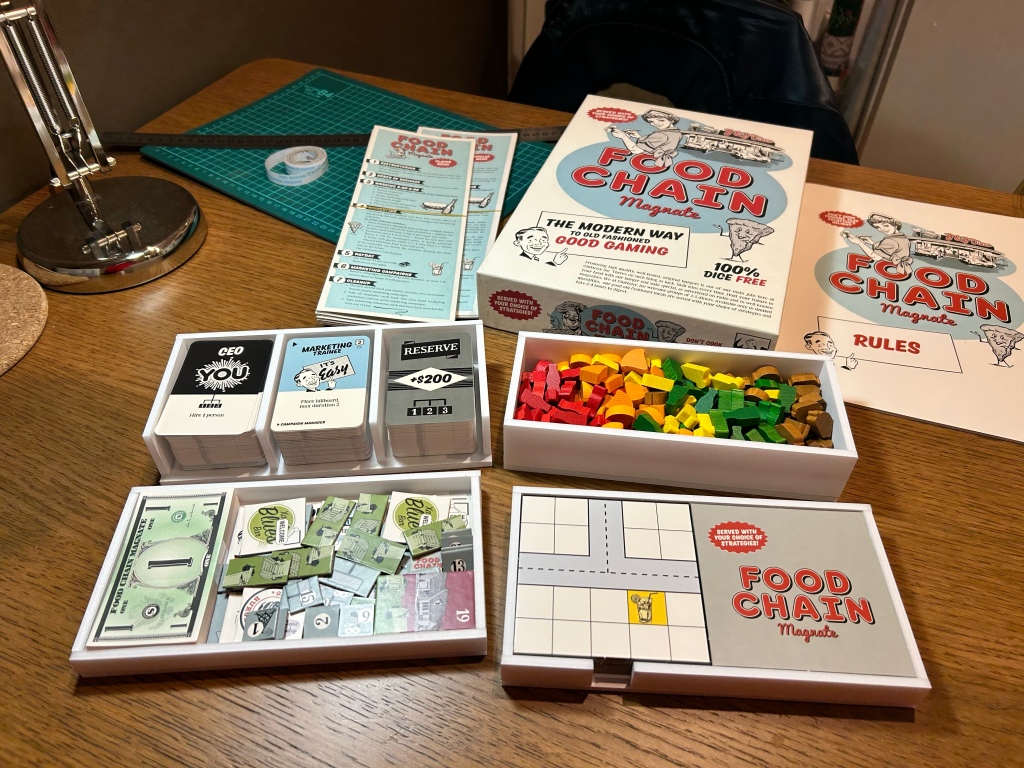
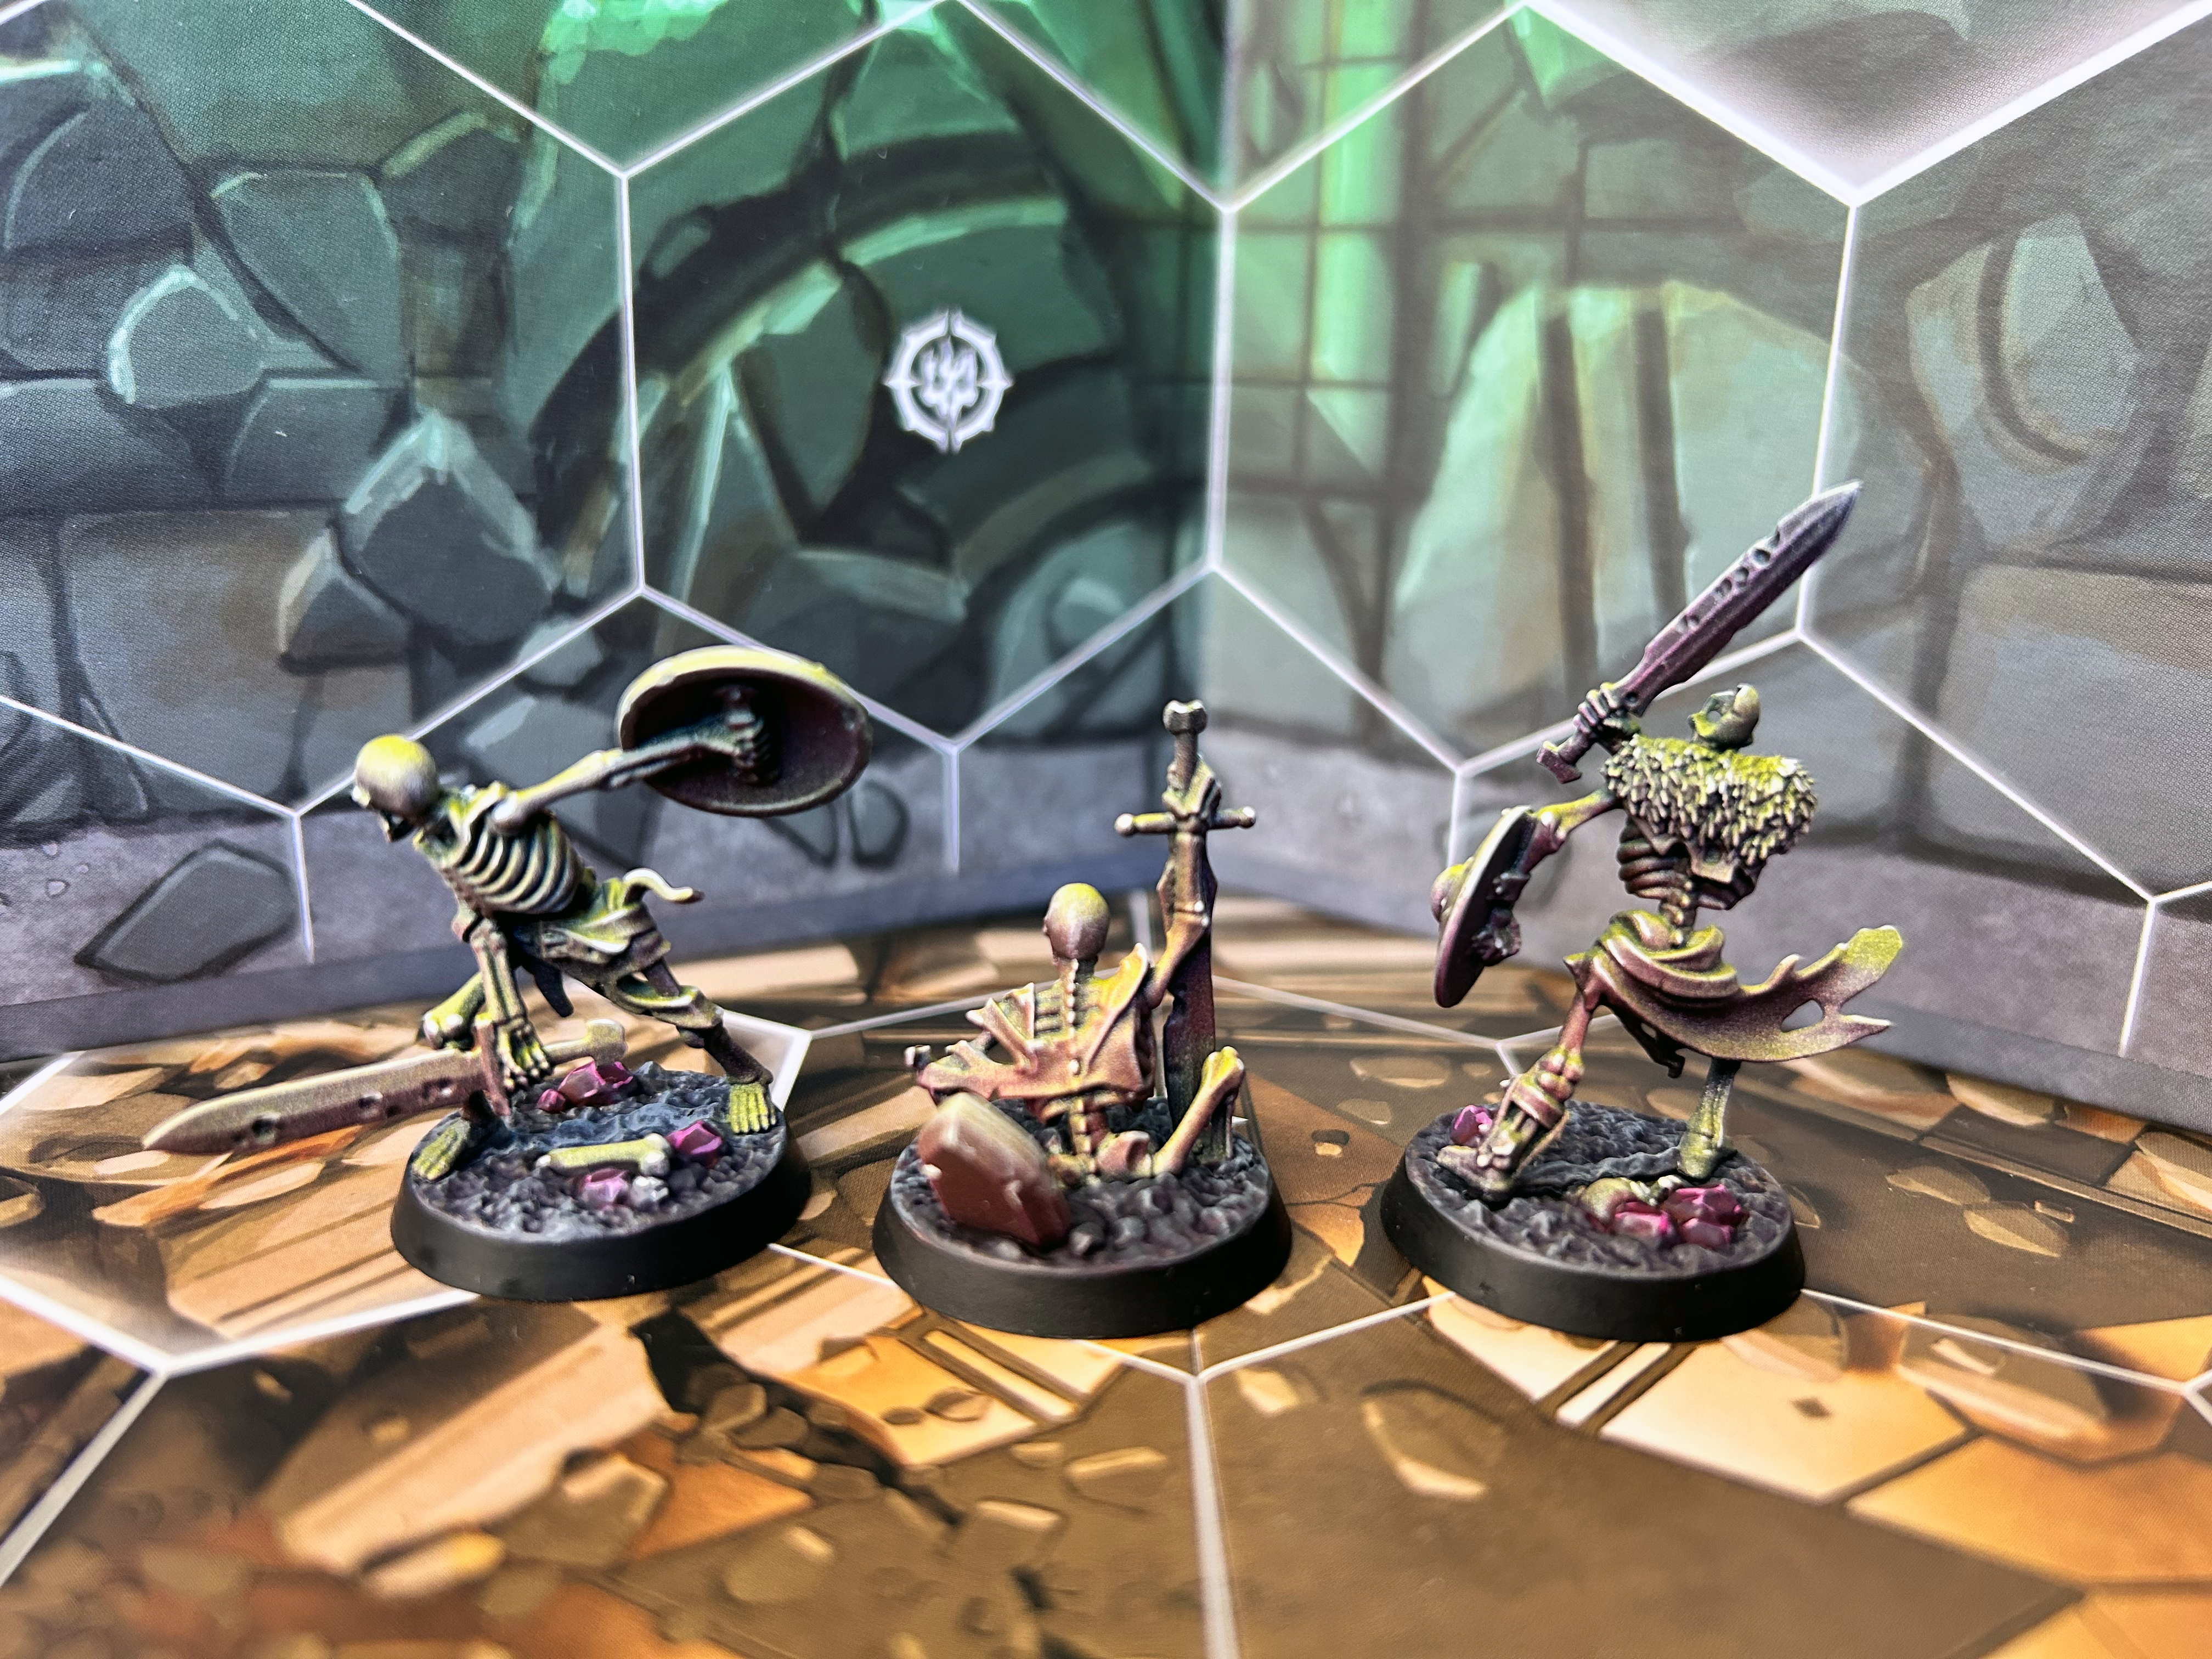
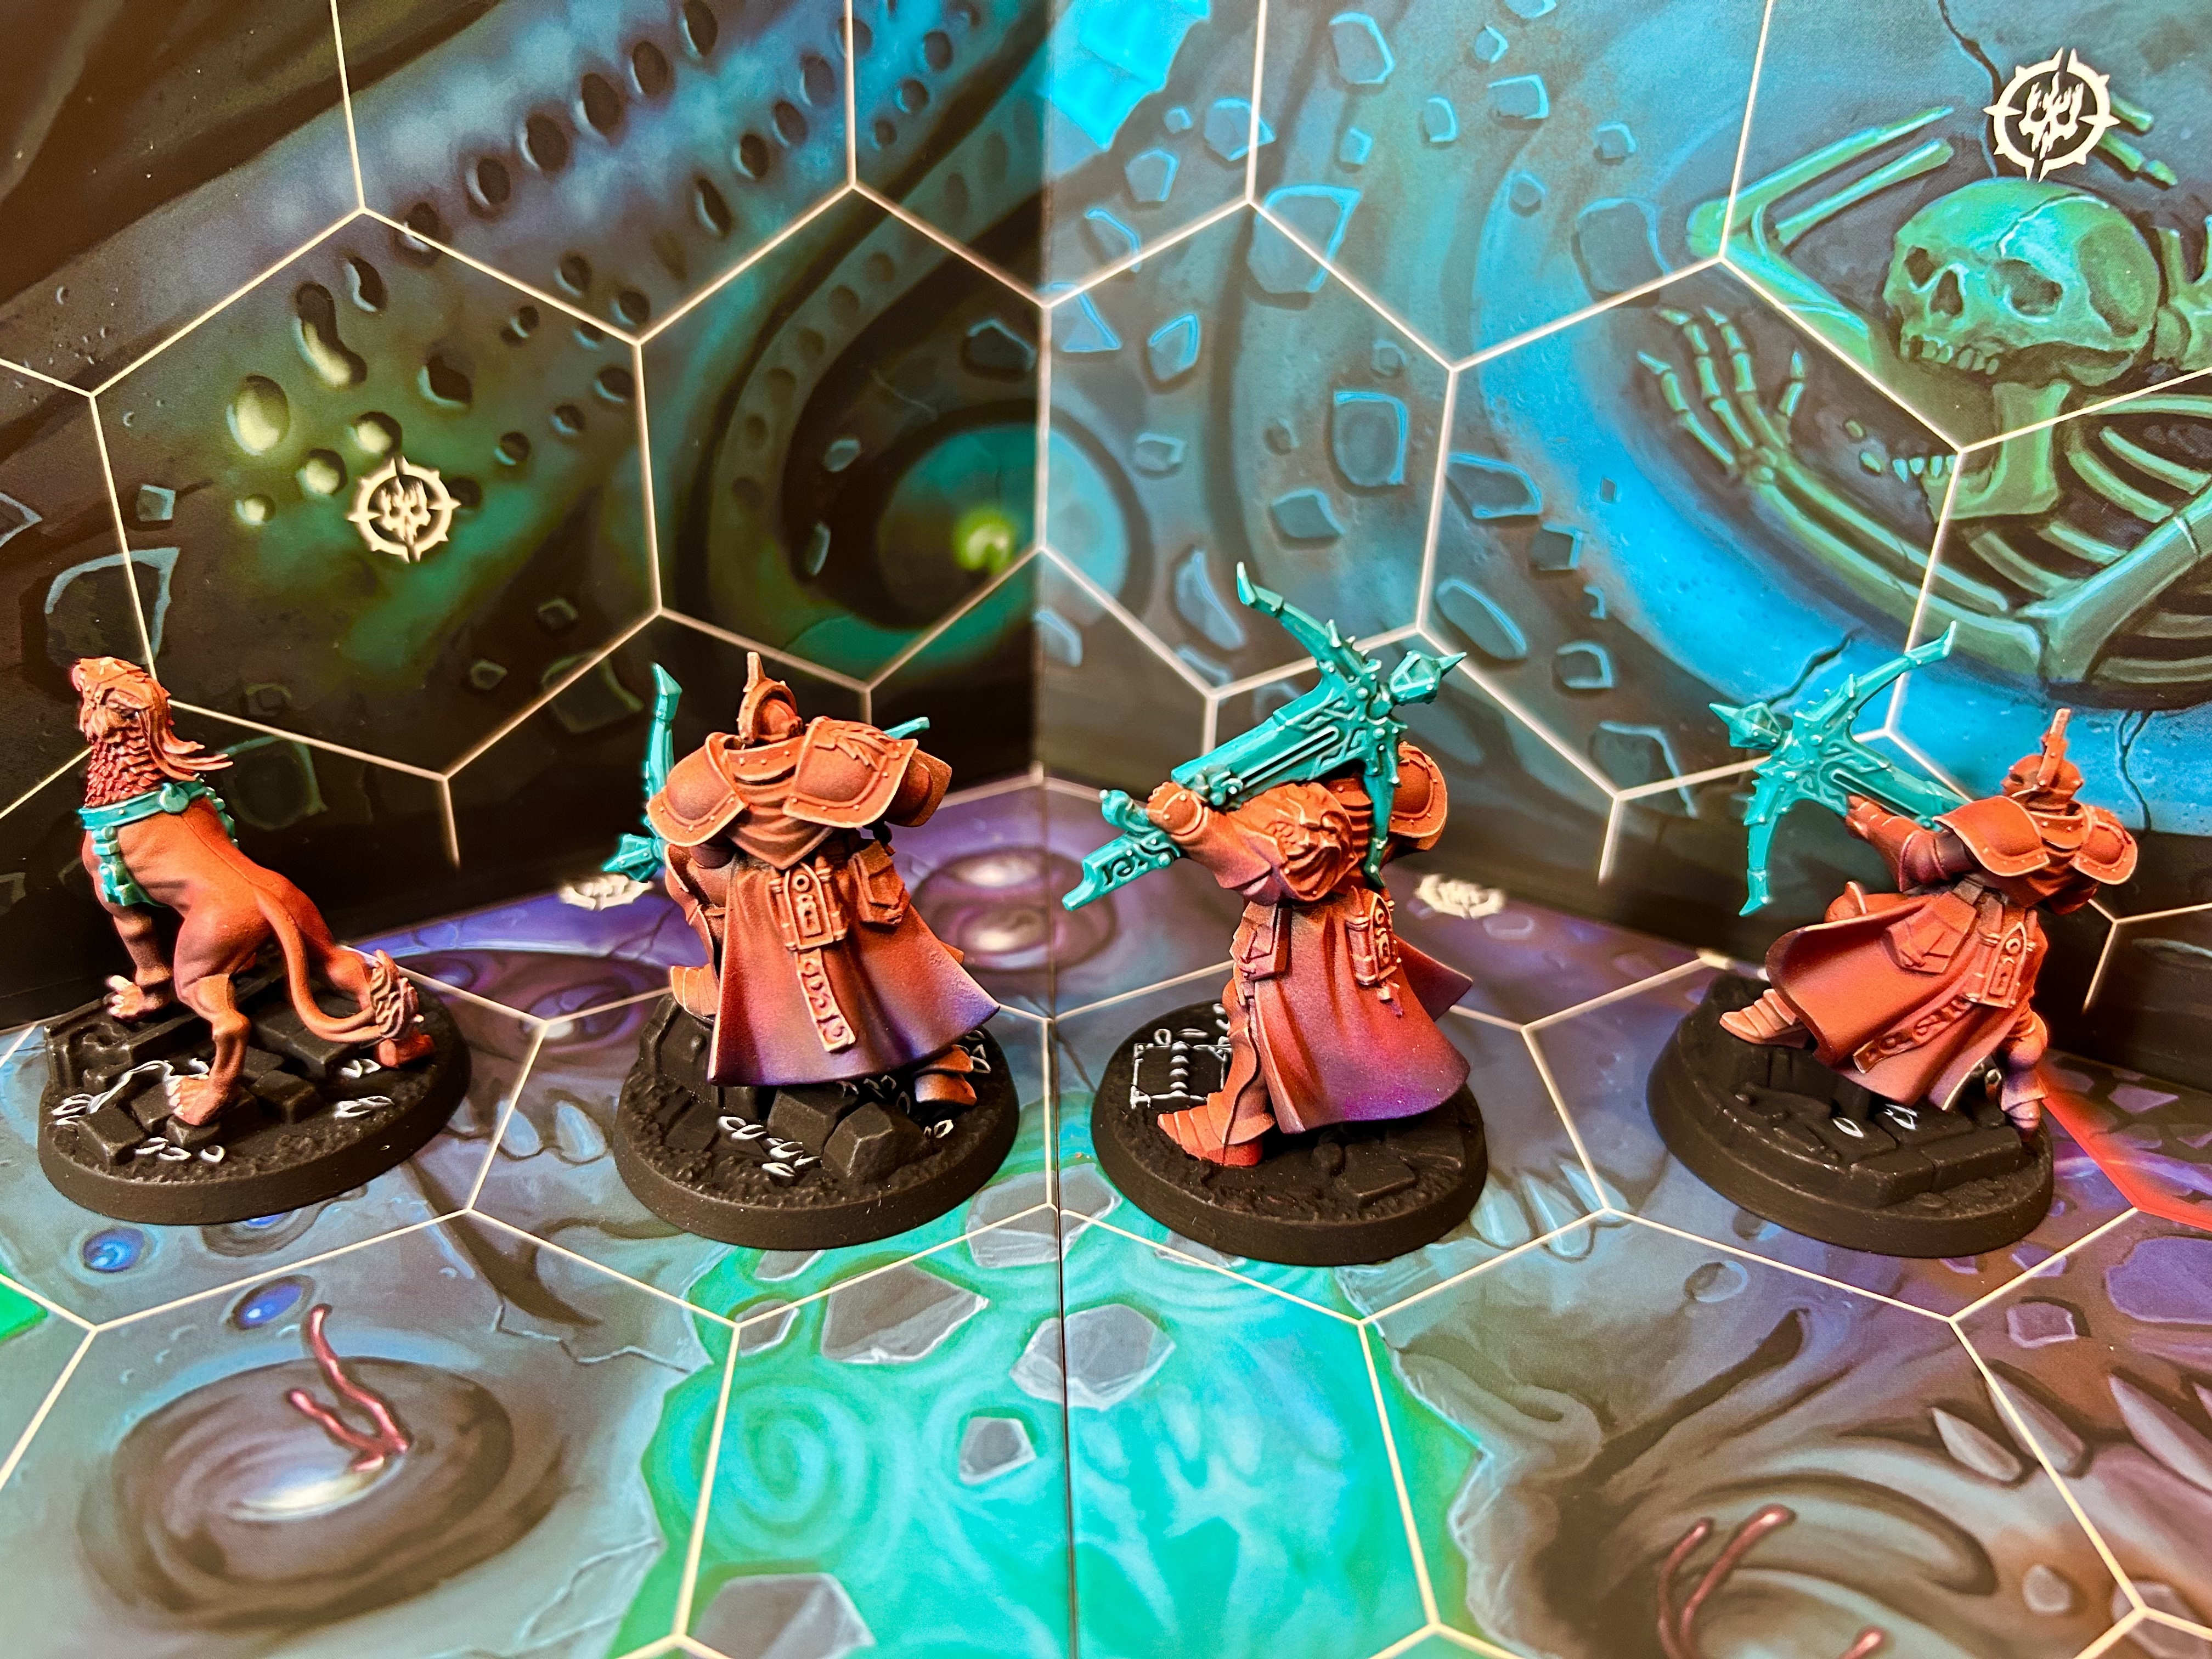
It was a wretched Melbourne Sunday afternoon, polar wind and rain sheeting across the city, punishing all those who dared step outside. Not me though, because I had a date with Death itself – The Sepulchral Guard, a collection of noble blades, valiant in undeath directed by their warden leader.
I never grew up much of a fan of the Undead. Don’t really engage with vampire or zombie films much either and I never really played them on the table top.
In Underworlds however I’ve really come around to horde war-bands, which quite often happen to be of the undead persuasion. To get around the game’s activation limit (12 turns per player over three phases of four activations) they feature mechanics that allow the player to activate multiple models in a single turn.
Directing a shambling horde to shuffle across the battlefield relentlessly is tremendous fun. Toss in some additional resurrection mechanics – having your fighters return from the grave time and again can really put the despair into an opponent. Love it!
Using the airbrush speed painting method, I completed these seven models in an afternoon. It’s been quite awhile since my last project and I neglected to change from a .35 needle to the .25 one in my Patriot 105 and it shows a bit in the grainy finish. I don’t mind it and I really like the uniform finish for this sort of war-band, they look like an unholy, unforgiving dusty horde that will give no quarter, for eternity!
Method
Underpainting Chaos Black Spray Airbrush VMC French Mirage Blue Airbrush Pro Acryl Titanium White
Coloring Airbrush from nadir GW Contrast Doomfire Magenta + flow improver Airbrush from zenith GW Contrast Bad Moon Yellow + flow improver Dry brush AKI Pale Sand Edge/Spot highlight AKI Pale Sand
Bases Base coat GW Skavenblight Dinge Wash GW Druchii Violet
I’ve got warm memories of last year’s Christmas break, a good week of getting up late, barely getting dressed, eating trifle and ham leftovers (not together!) and playing Cyberpunk 2077 all day with the atmosphere of an inner city Melbourne revelling in leisure around me.
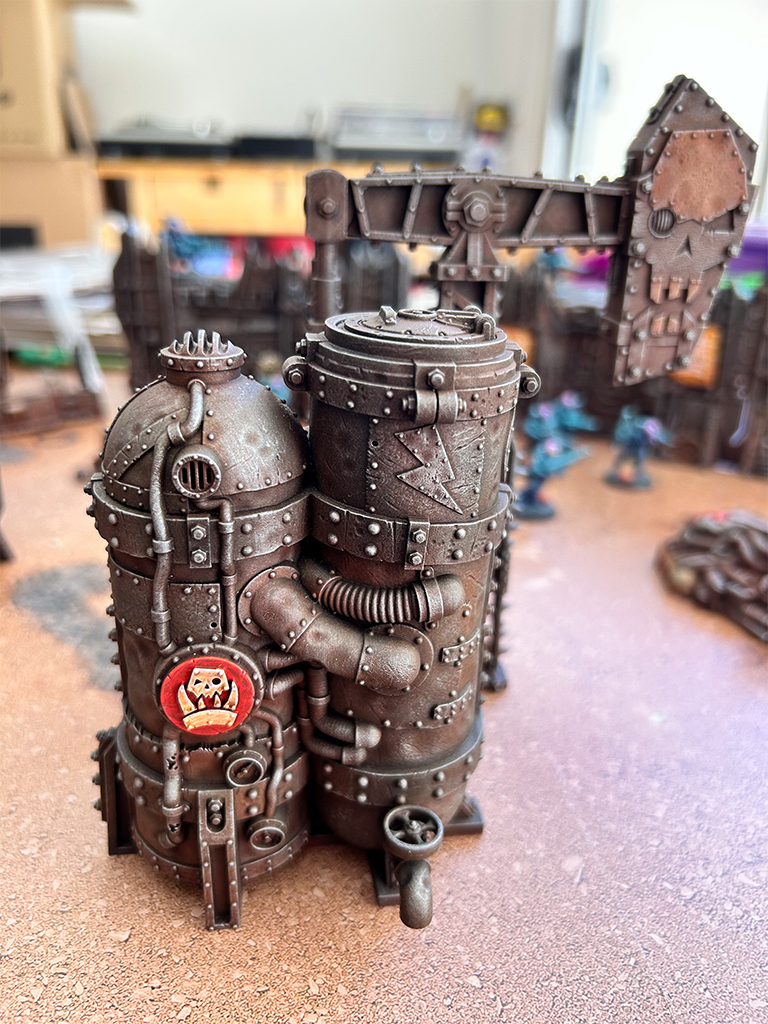
This summer break there’s been a bit less Cyberpunk and more hobby. I will try to make an annual tradition of completing a hobby project during my time off – without making it feel like work, and this year’s project is the Ork terrain from the Kill Team Octarius box set.
Fixer-upper in an ‘up and coming’ location. Make it yours today!
Thanks to Youtube I’ve seen many people extol the virtues of oil washes as a way of applying rich definition to miniatures and more particularly terrain pieces. Compared to a product such as a GW wash, they are much, much cheaper and have a flexibility (you have to mix them yourself) not afforded by a pre-mixed product. You can also re-activate them while they’re curing to wipe off excess wash and fine tune the amount of tone they apply.
Offsetting these benefits are a few drawbacks. Hydrocarbon based products are messier, smellier and more toxic than water based ones. They can also dry a little bit glossy – although this depends on the mineral spirit/thinner that is employed. The drying time is great for the aforementioned wiping, but I had to leave my terrain for over 48 hours before spraying it with a matt varnish.
Overall though, I think the benefits are more than worth the hassle and I will be using them frequently for large scale paint jobs.
The Wyrmblade advances warily through a deserted town square
The ‘problem’ with these terrain pieces is that they’re so fantastically detailed. It took some effort to not paint all the details individually. I’d still be in the process – or more likely have just burned out and moved onto something else. So good on me for having the maturity to leave a lot of detail as ‘rusty steel’!
There’s gold in them thar scatter terrain. Not really, just rusty crap.One stop oil pump and refinery. Clever boyz.
Preparation Chaos Black spray Airbrush Leadbelcher zenithal (sort of)
Rusty Steel Airbrush Vallejo Air Brown RLM26 Airbrush VMC Amaranth Red Oil wash Windsor and Newton Winton Burnt Umber ‘pea size’ : 6ml of Mineral Spirit …drying time… Drybrush Leadbelcher Light drybrush of Runefang steel
All the elements get the wash, not just the steel but I won’t go into them. The whole set needs more than 6ml of wash – probably closer to 30ml but that is the ratio.
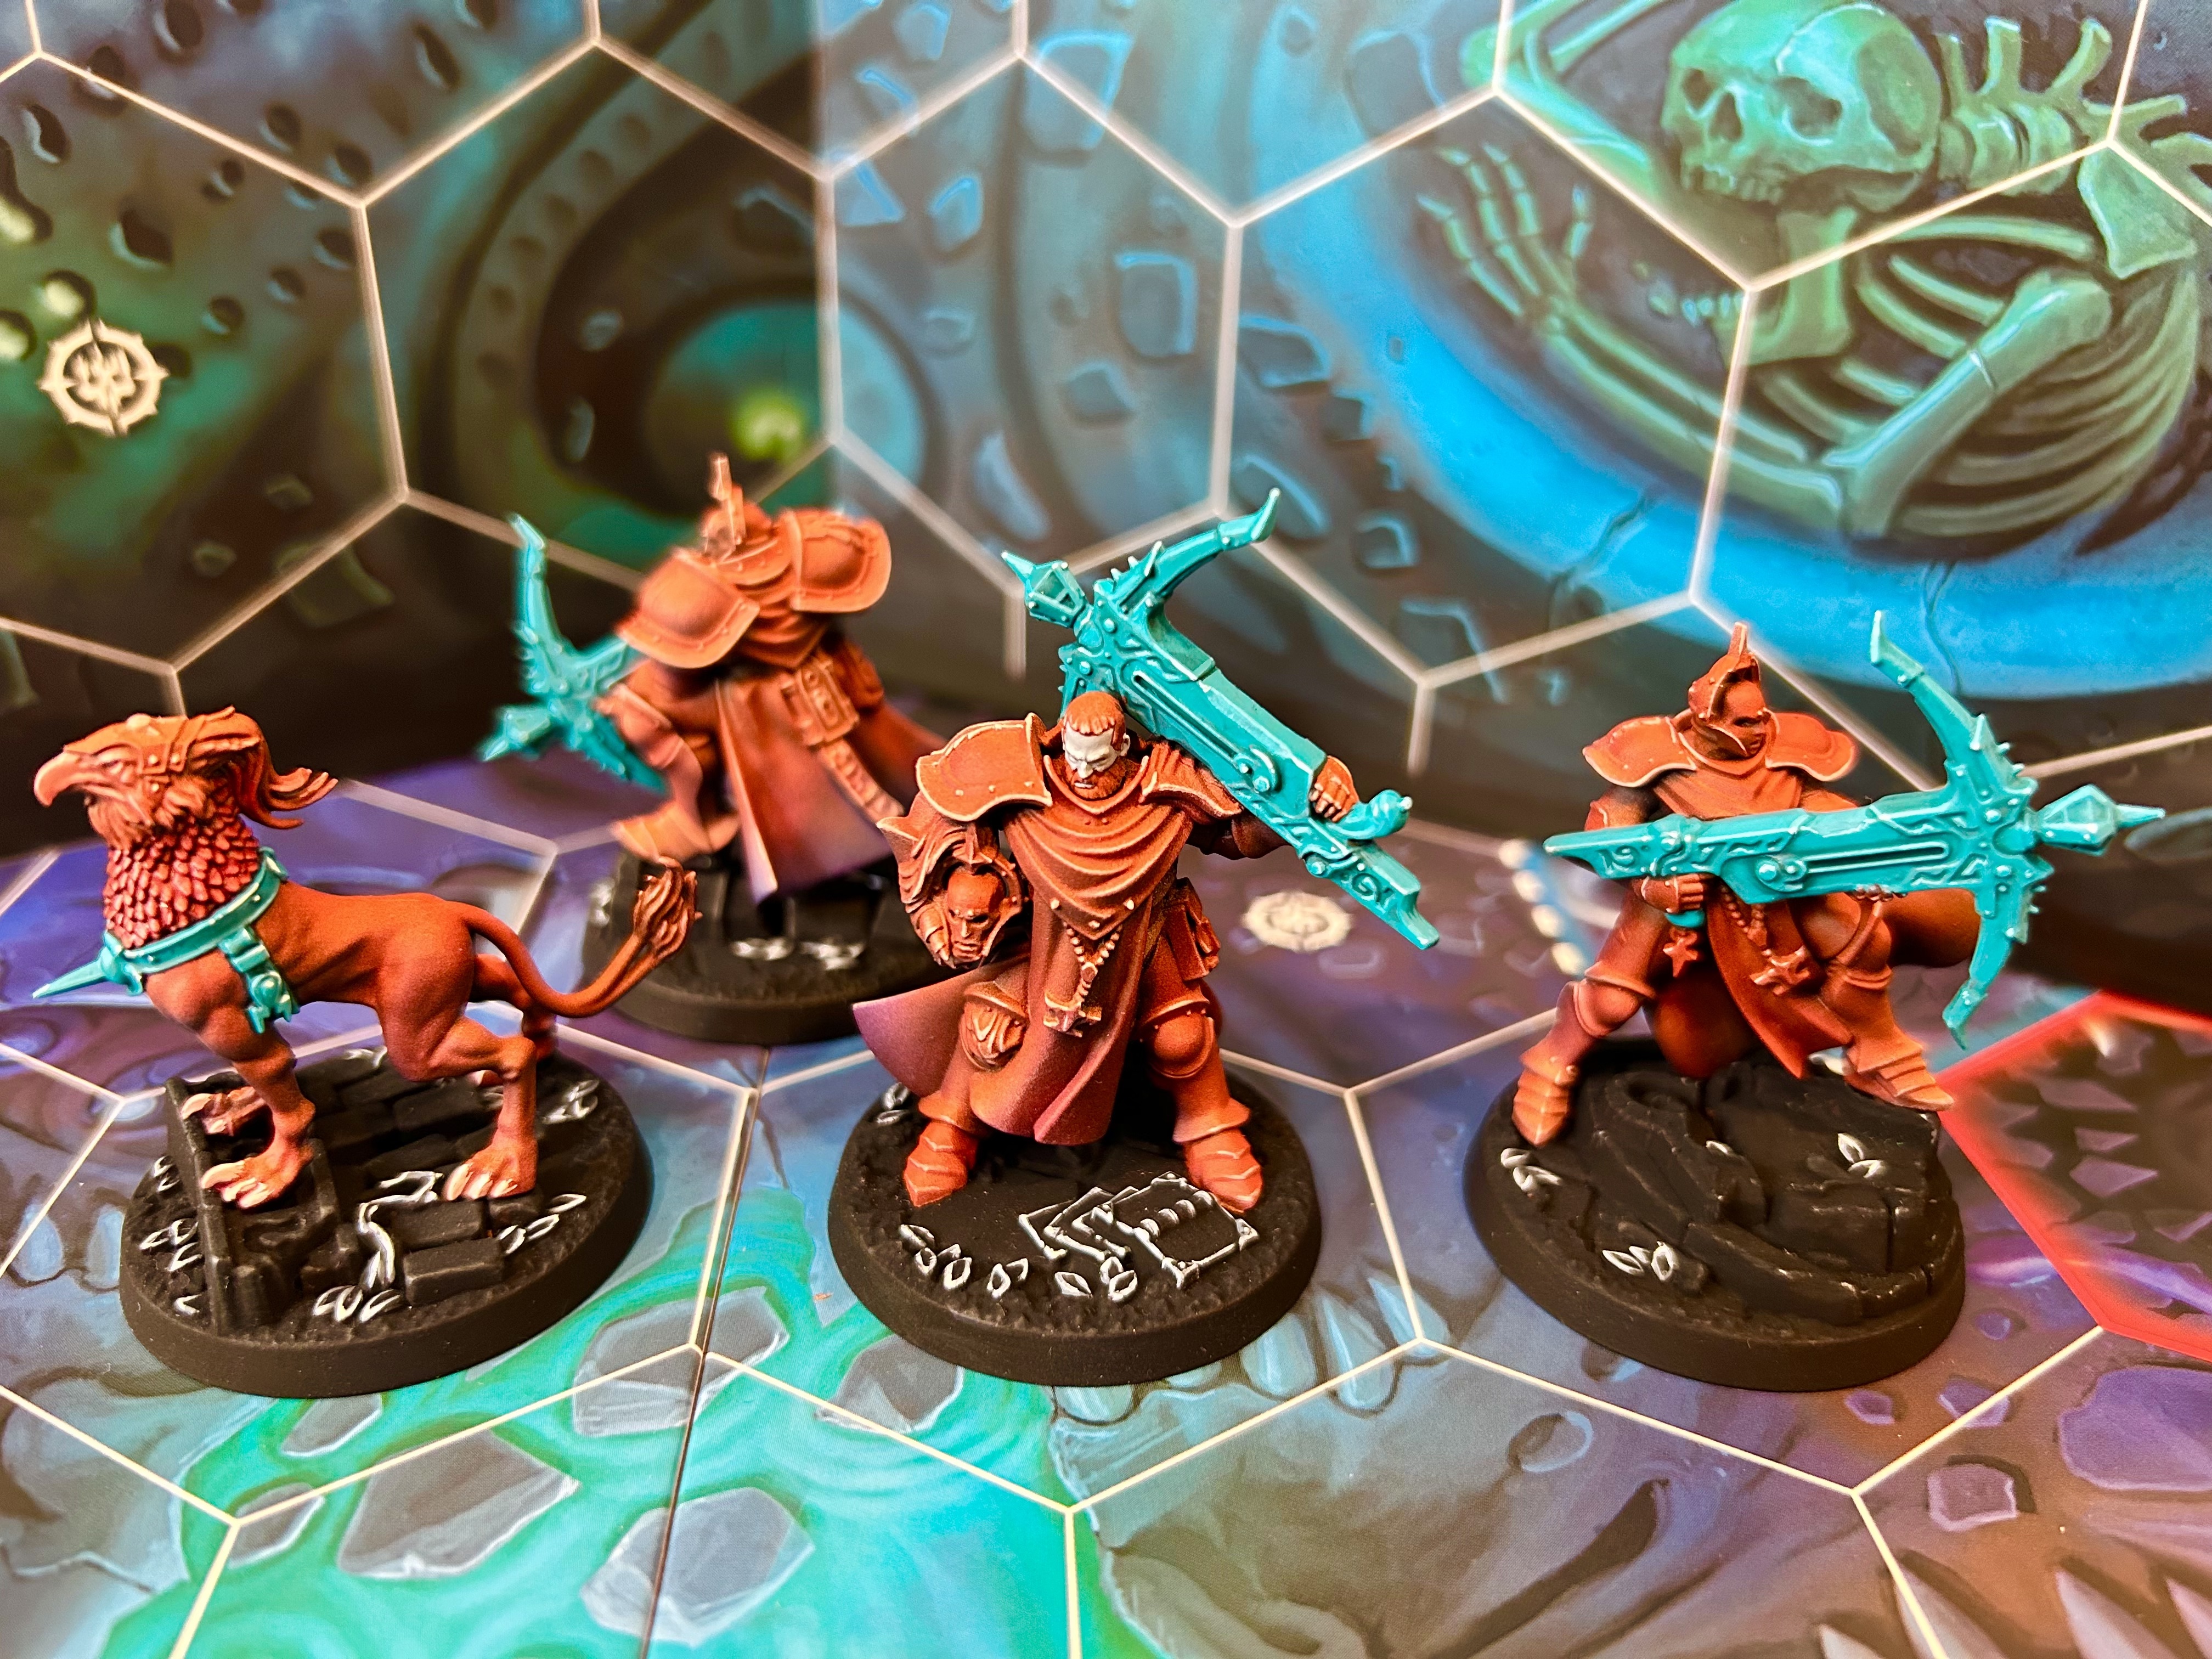
I seem to have a soft spot for Stormcast – something I don’t share with their 40k counterparts. Perhaps it’s because they’re not as ubiquitous as Space Marines despite being the poster child for Age of Sigmar, neither are they over-powered relative to other Underworlds war bands (on the contrary actually) and i do enjoy the creative opportunities afforded by such large frames abound with flat surfaces.
These minis are on the surface however, a failure. Emboldened by the outcome of my Wyrmblade Kill Team, I leapt with gusto into a follow up project that ultimately didn’t turn out the way I’d hoped. I’m actually happy with the result, Fanta coloured Stormcast fit my lurid aesthetic nicely, but I had hoped that the Magmadroth Flame was more of a highlight than a total saturation.
Essentially I’ve tried to imagine these hardy warriors as AI constructs inside cyberspace – as if they were ICE (if you’re familiar with cyberpunk/Android Netrunner) hence the limited and contrasting palette, the teal crossbows that look like nerf guns and the Black 2.0 bases that are reflecting too much light in these photos. I painted just the organic elements of the bases (sans skulls) white as if they were part of some rebellious eco-system fighting against the endless dark expanse!
I keep saying I need to paint some good old fashioned metal – I might actually follow through on the next project!
Recipe
Zenithal Prime Chaos Black spray base coat French Mirage Blue VMC airbrush Pro Acryl Titanium White airbrush Pro Acryl Titanium White dry brush
Cloak/armour/hide/claws Nadir airbrush VMC Prussian Blue 1:4 Airbrush Thinner CC Doomfire Magenta airbrush CC Magmadroth Flame airbrush VGC Rosy Flesh dry brush VGC Rosy Flesh edge
Ballistae VMC Blue Green Lahmian Medium 1:1 Coelia Greenshade tint VMC Blue Green 2:1 AK Pastel Green highlight AK Pastel Green edge
Drakan’s face VMC Pale Blue Grey base coat Nuln Oil wash eyes VMC Pale Blue Grey 2:1 VMC White highlight
Bases Black 2.0 base coat (several) VMC Black Grey dry brush
Base detail Russ Grey edge VGC Ice Blue edge VMC White edge
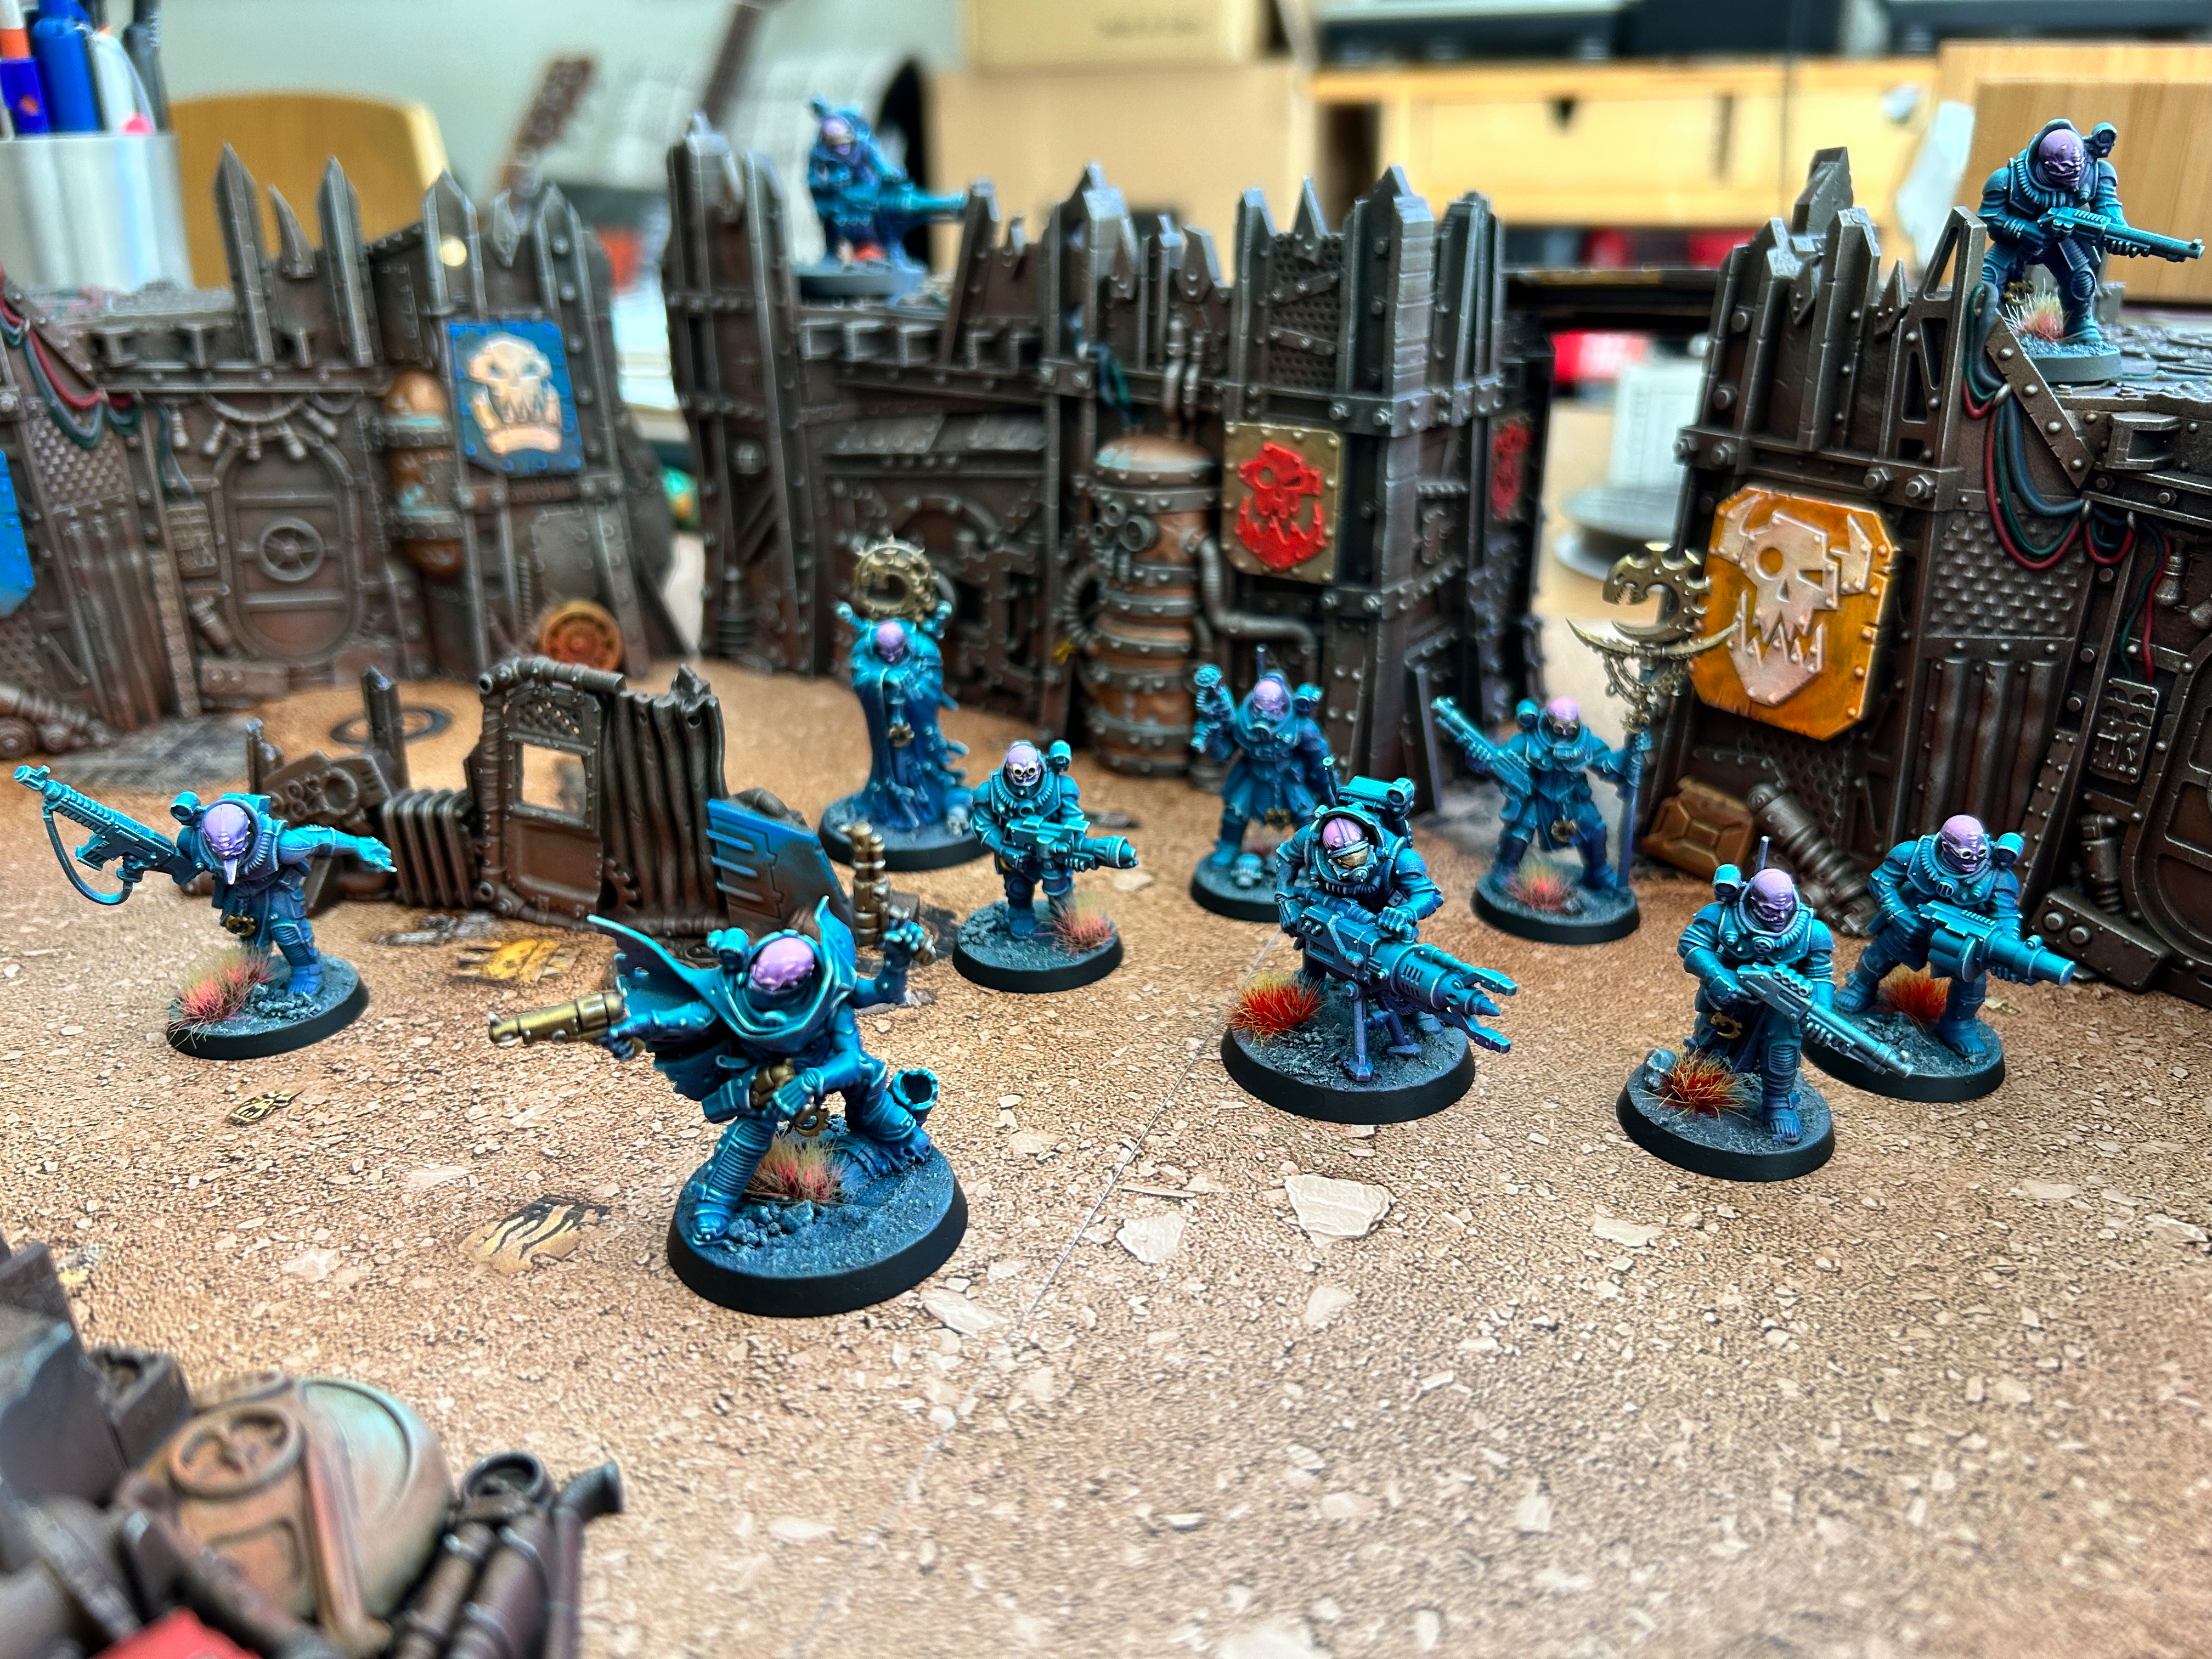
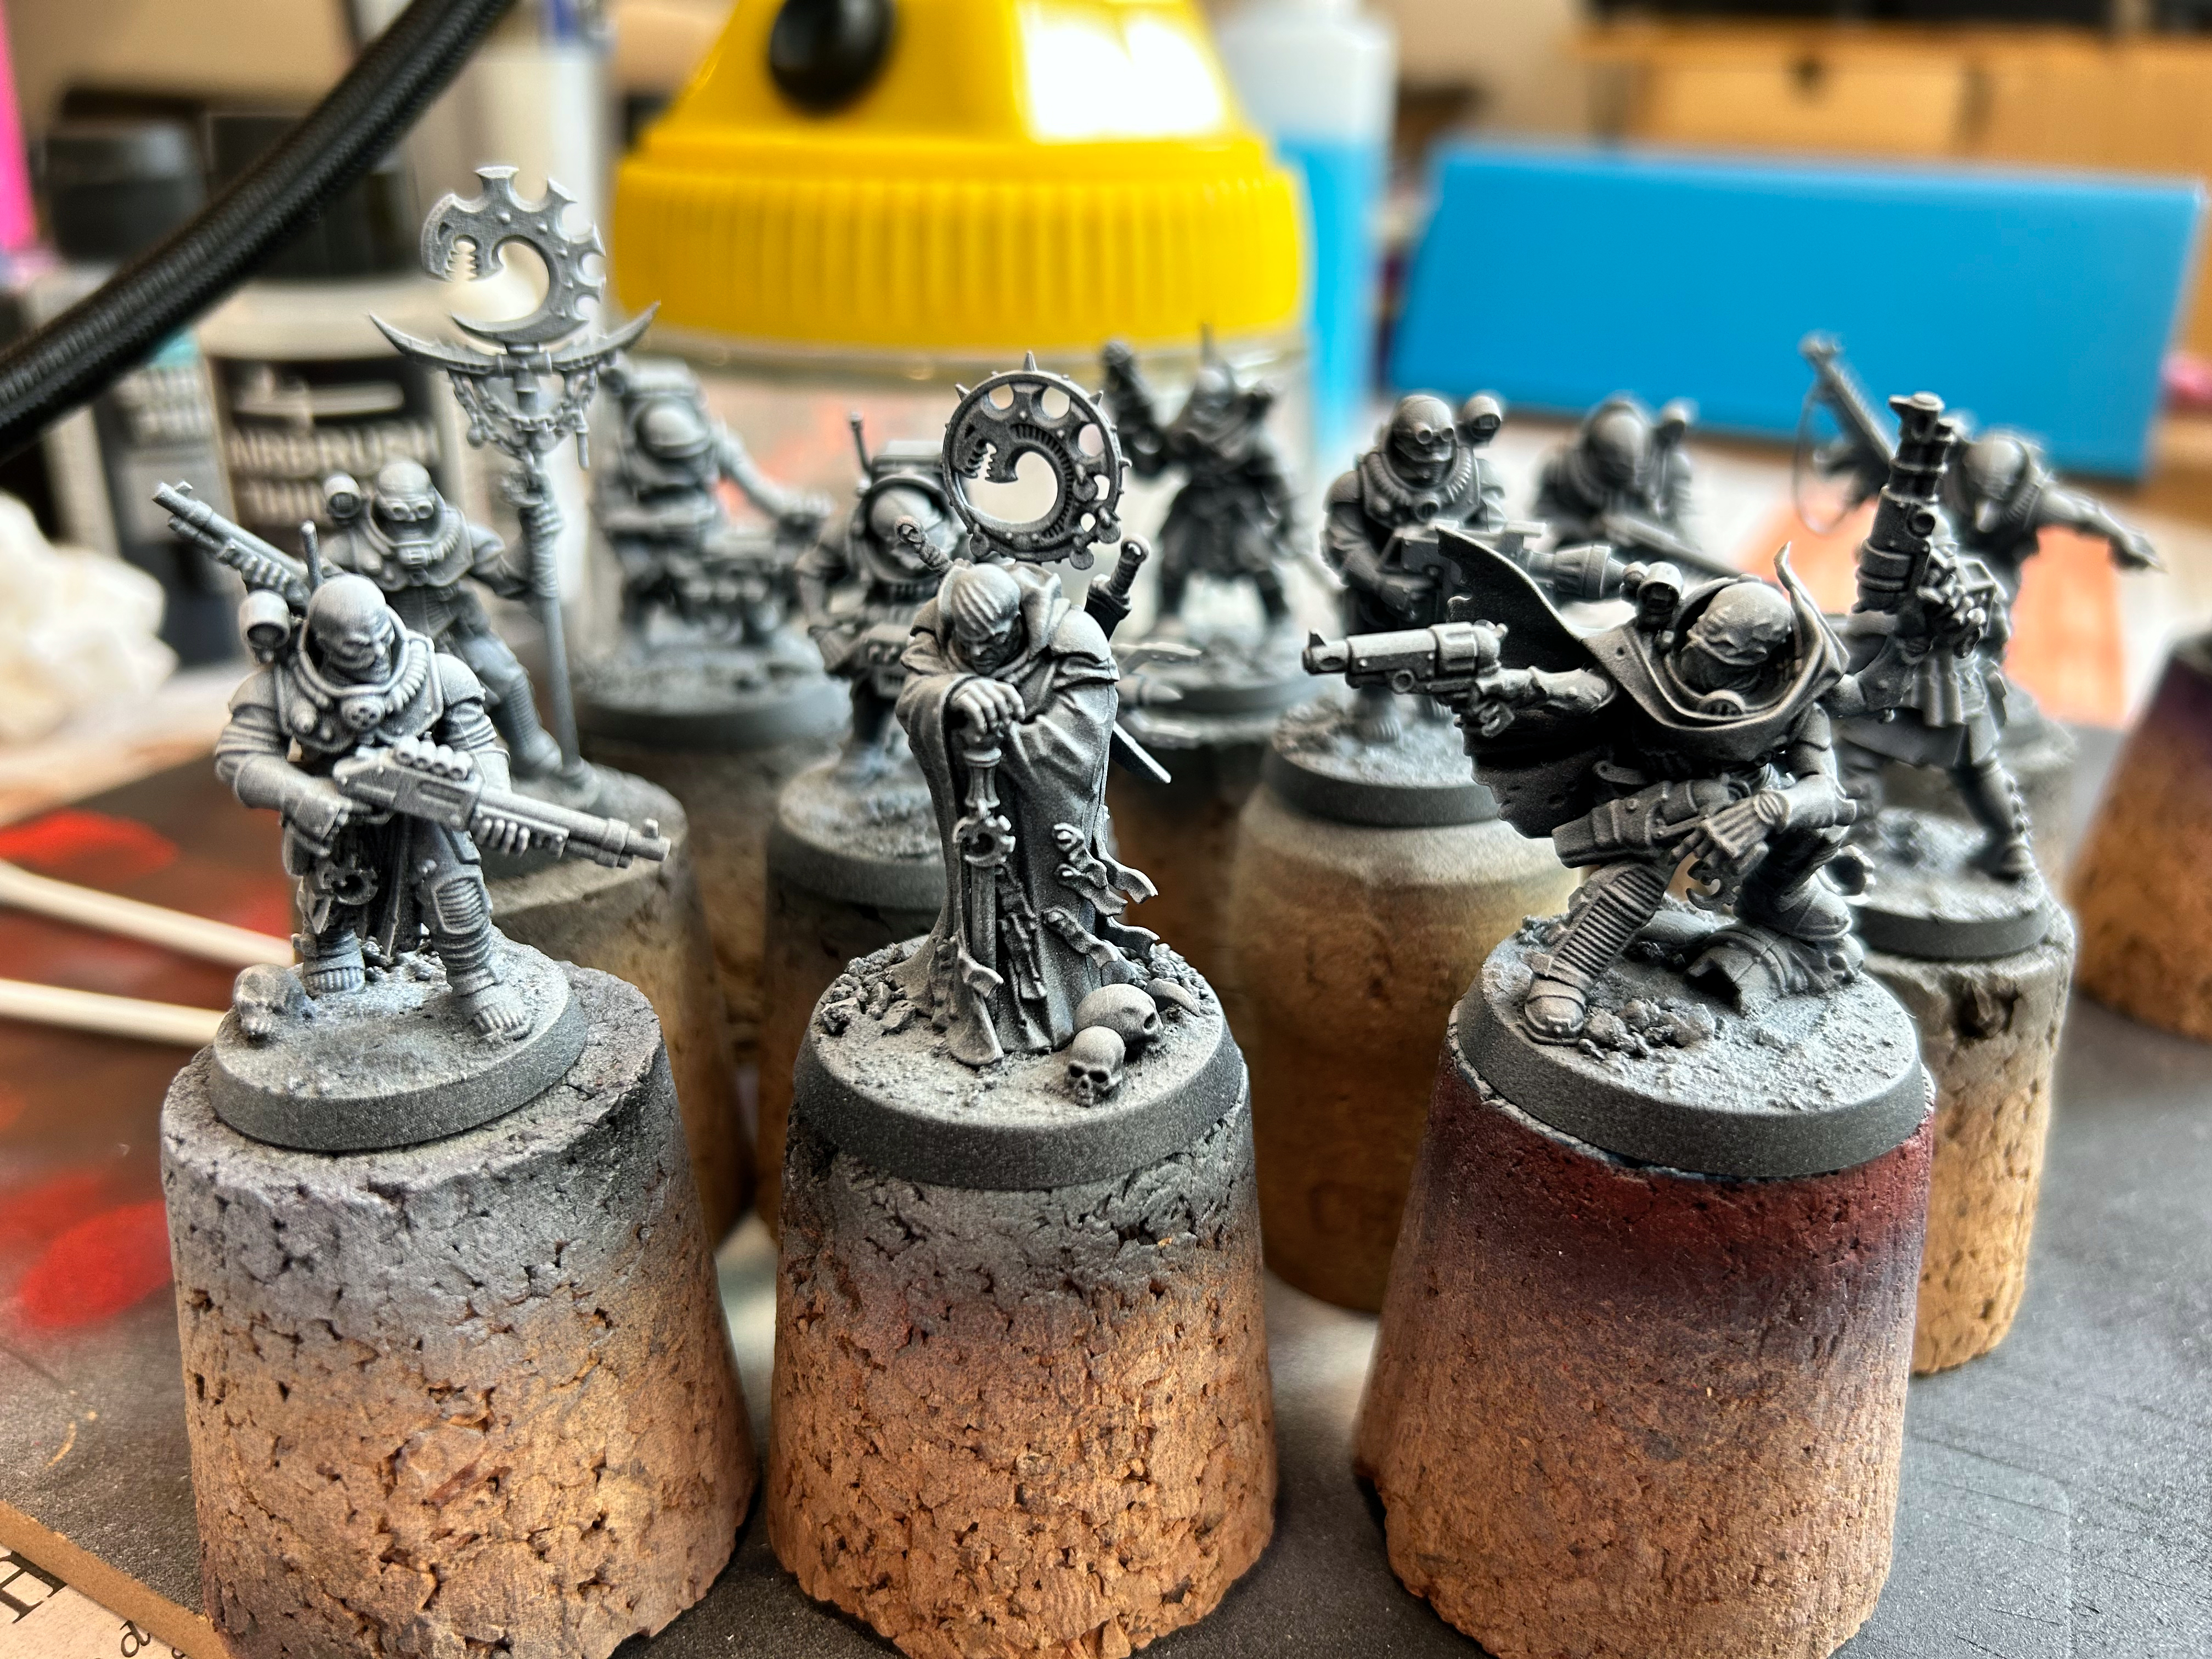
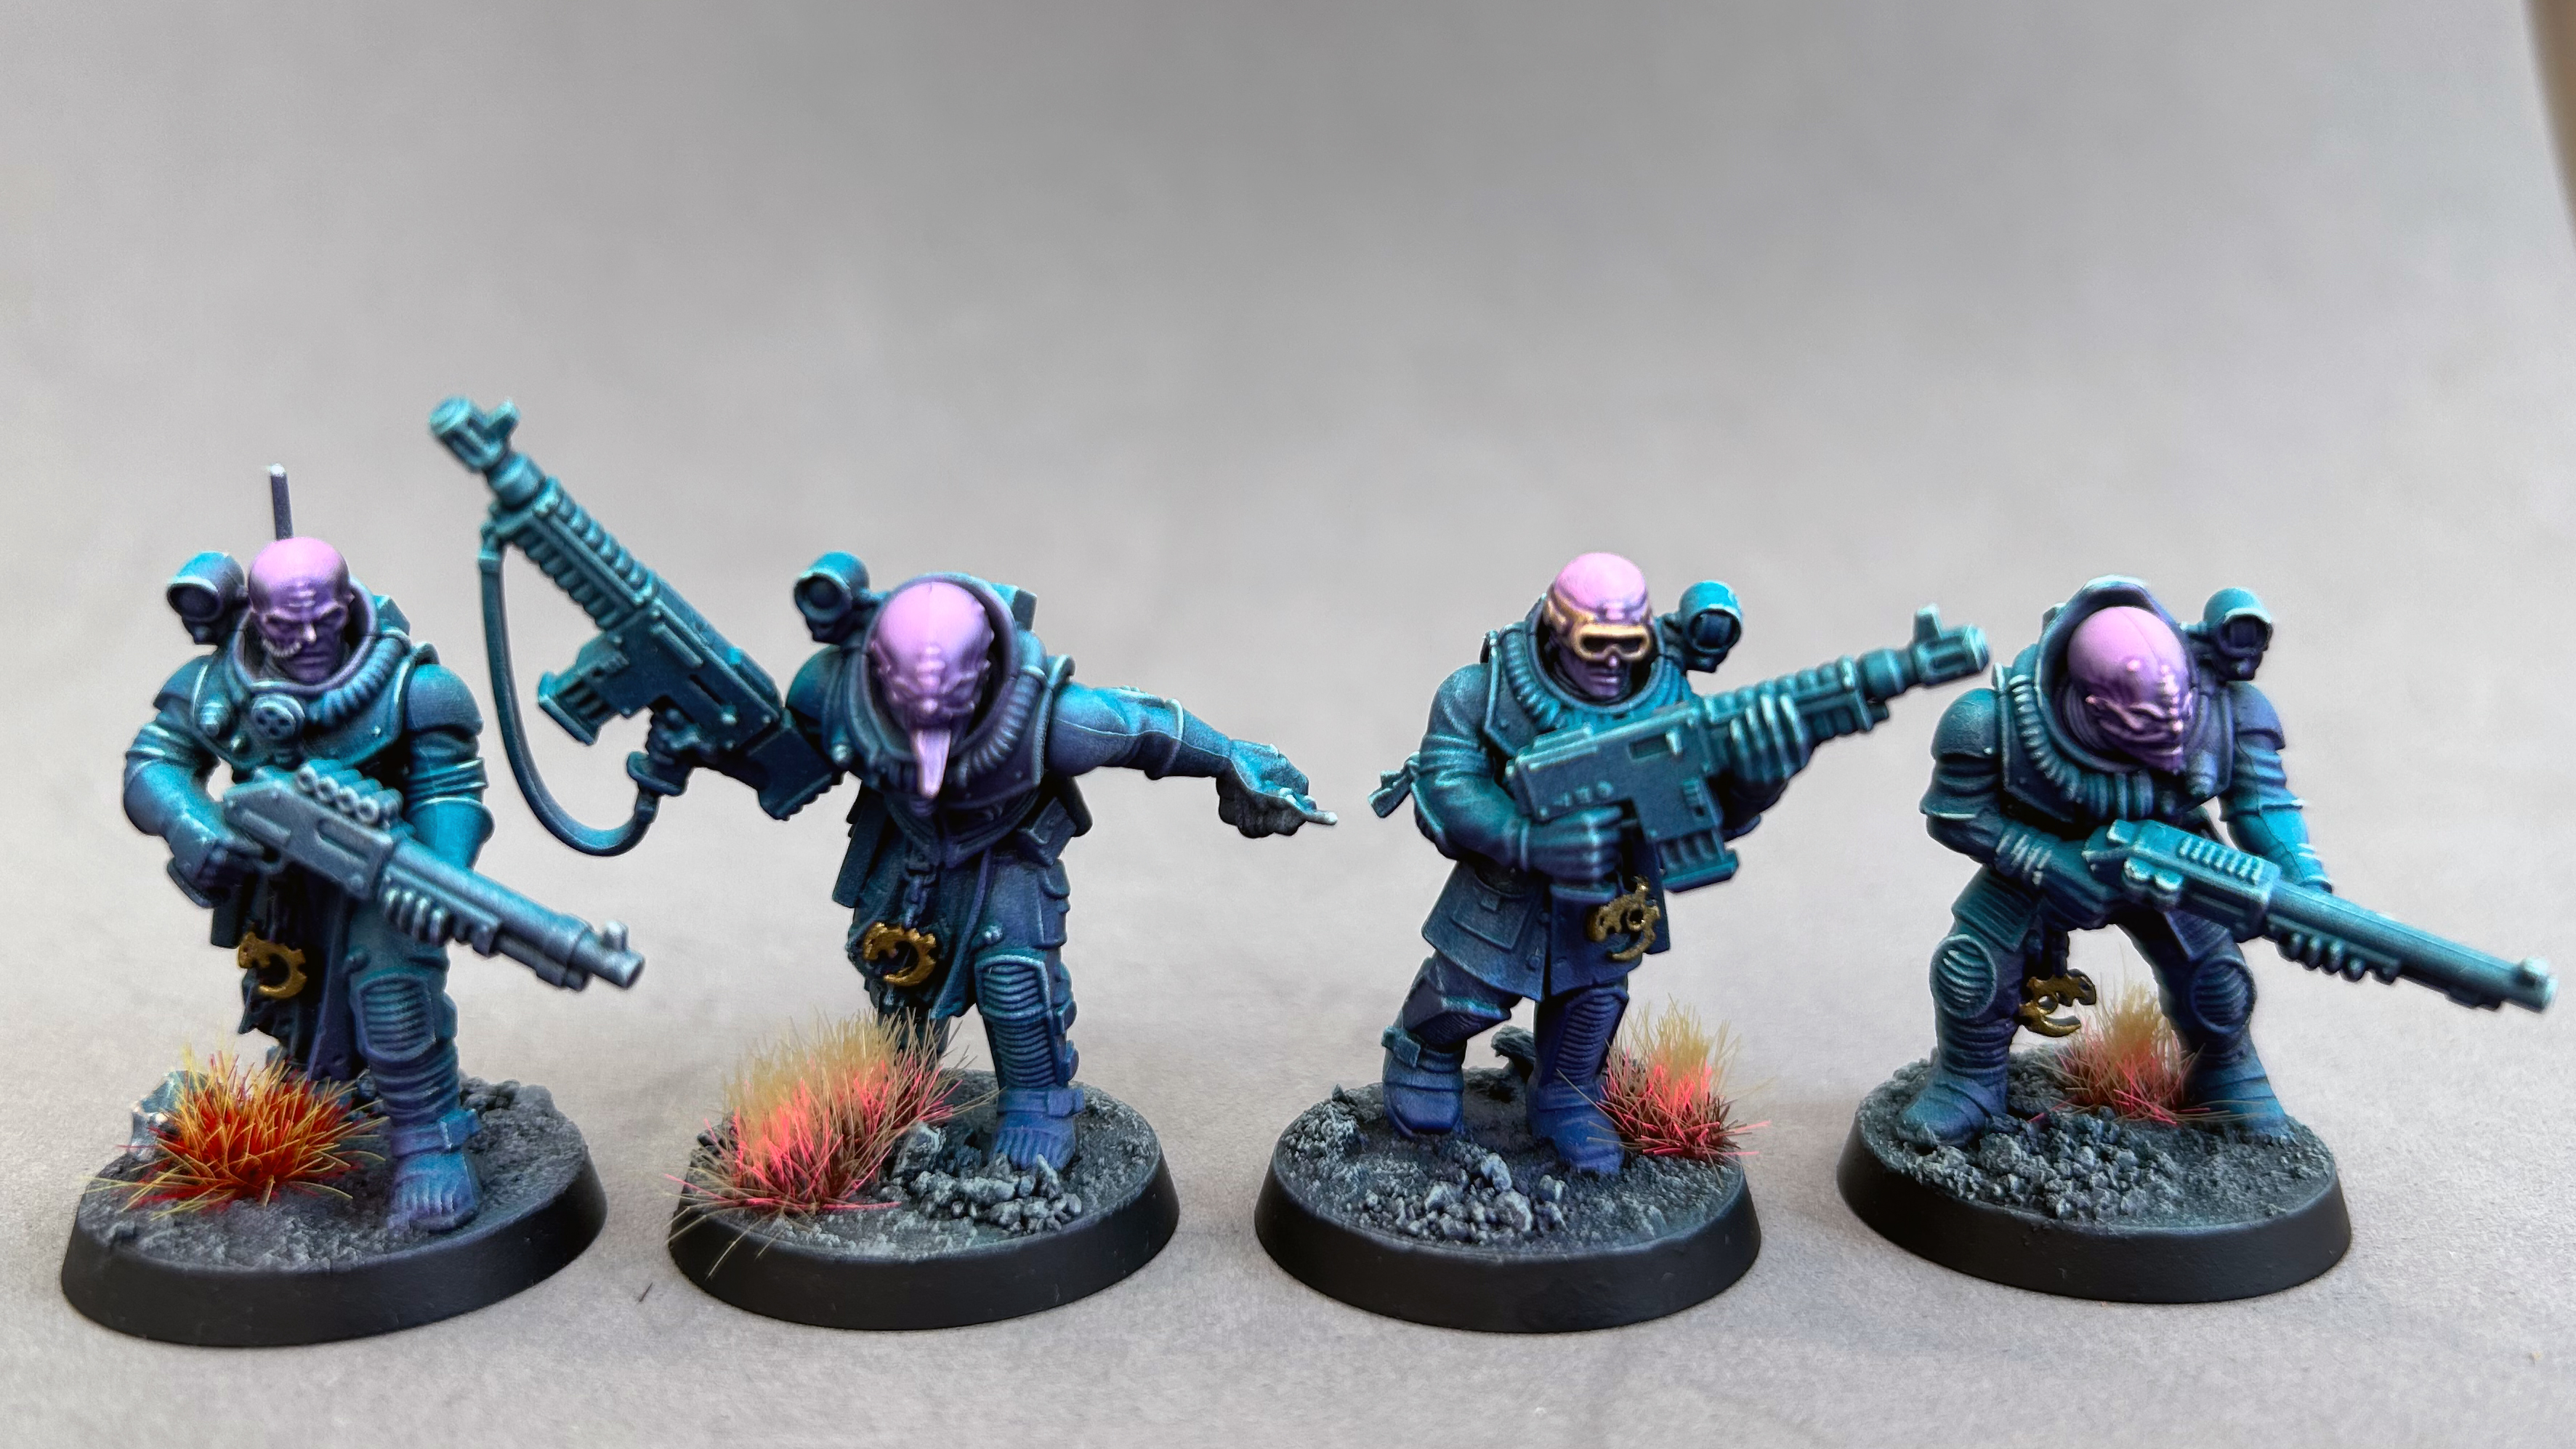
So I’ve been getting into Kill Team (KT) lately. And by ‘getting into’ I mean assembling and painting some of the minis that I’ve had on sprues for the three KT boxes I’ve accumulated over the years. I’ve always been attracted to the small scale skirmish game but never had the energy or impetus to get moving on it.
One of my biggest hobby conundrums has been ‘how to quickly get many minis painted to a standard that I can accept’ for gaming. I am a sporadic painter, with a fair old streak of perfectionism that limits my ability to get things done. Not traits or habits conducive to getting an army or even a squad completed.
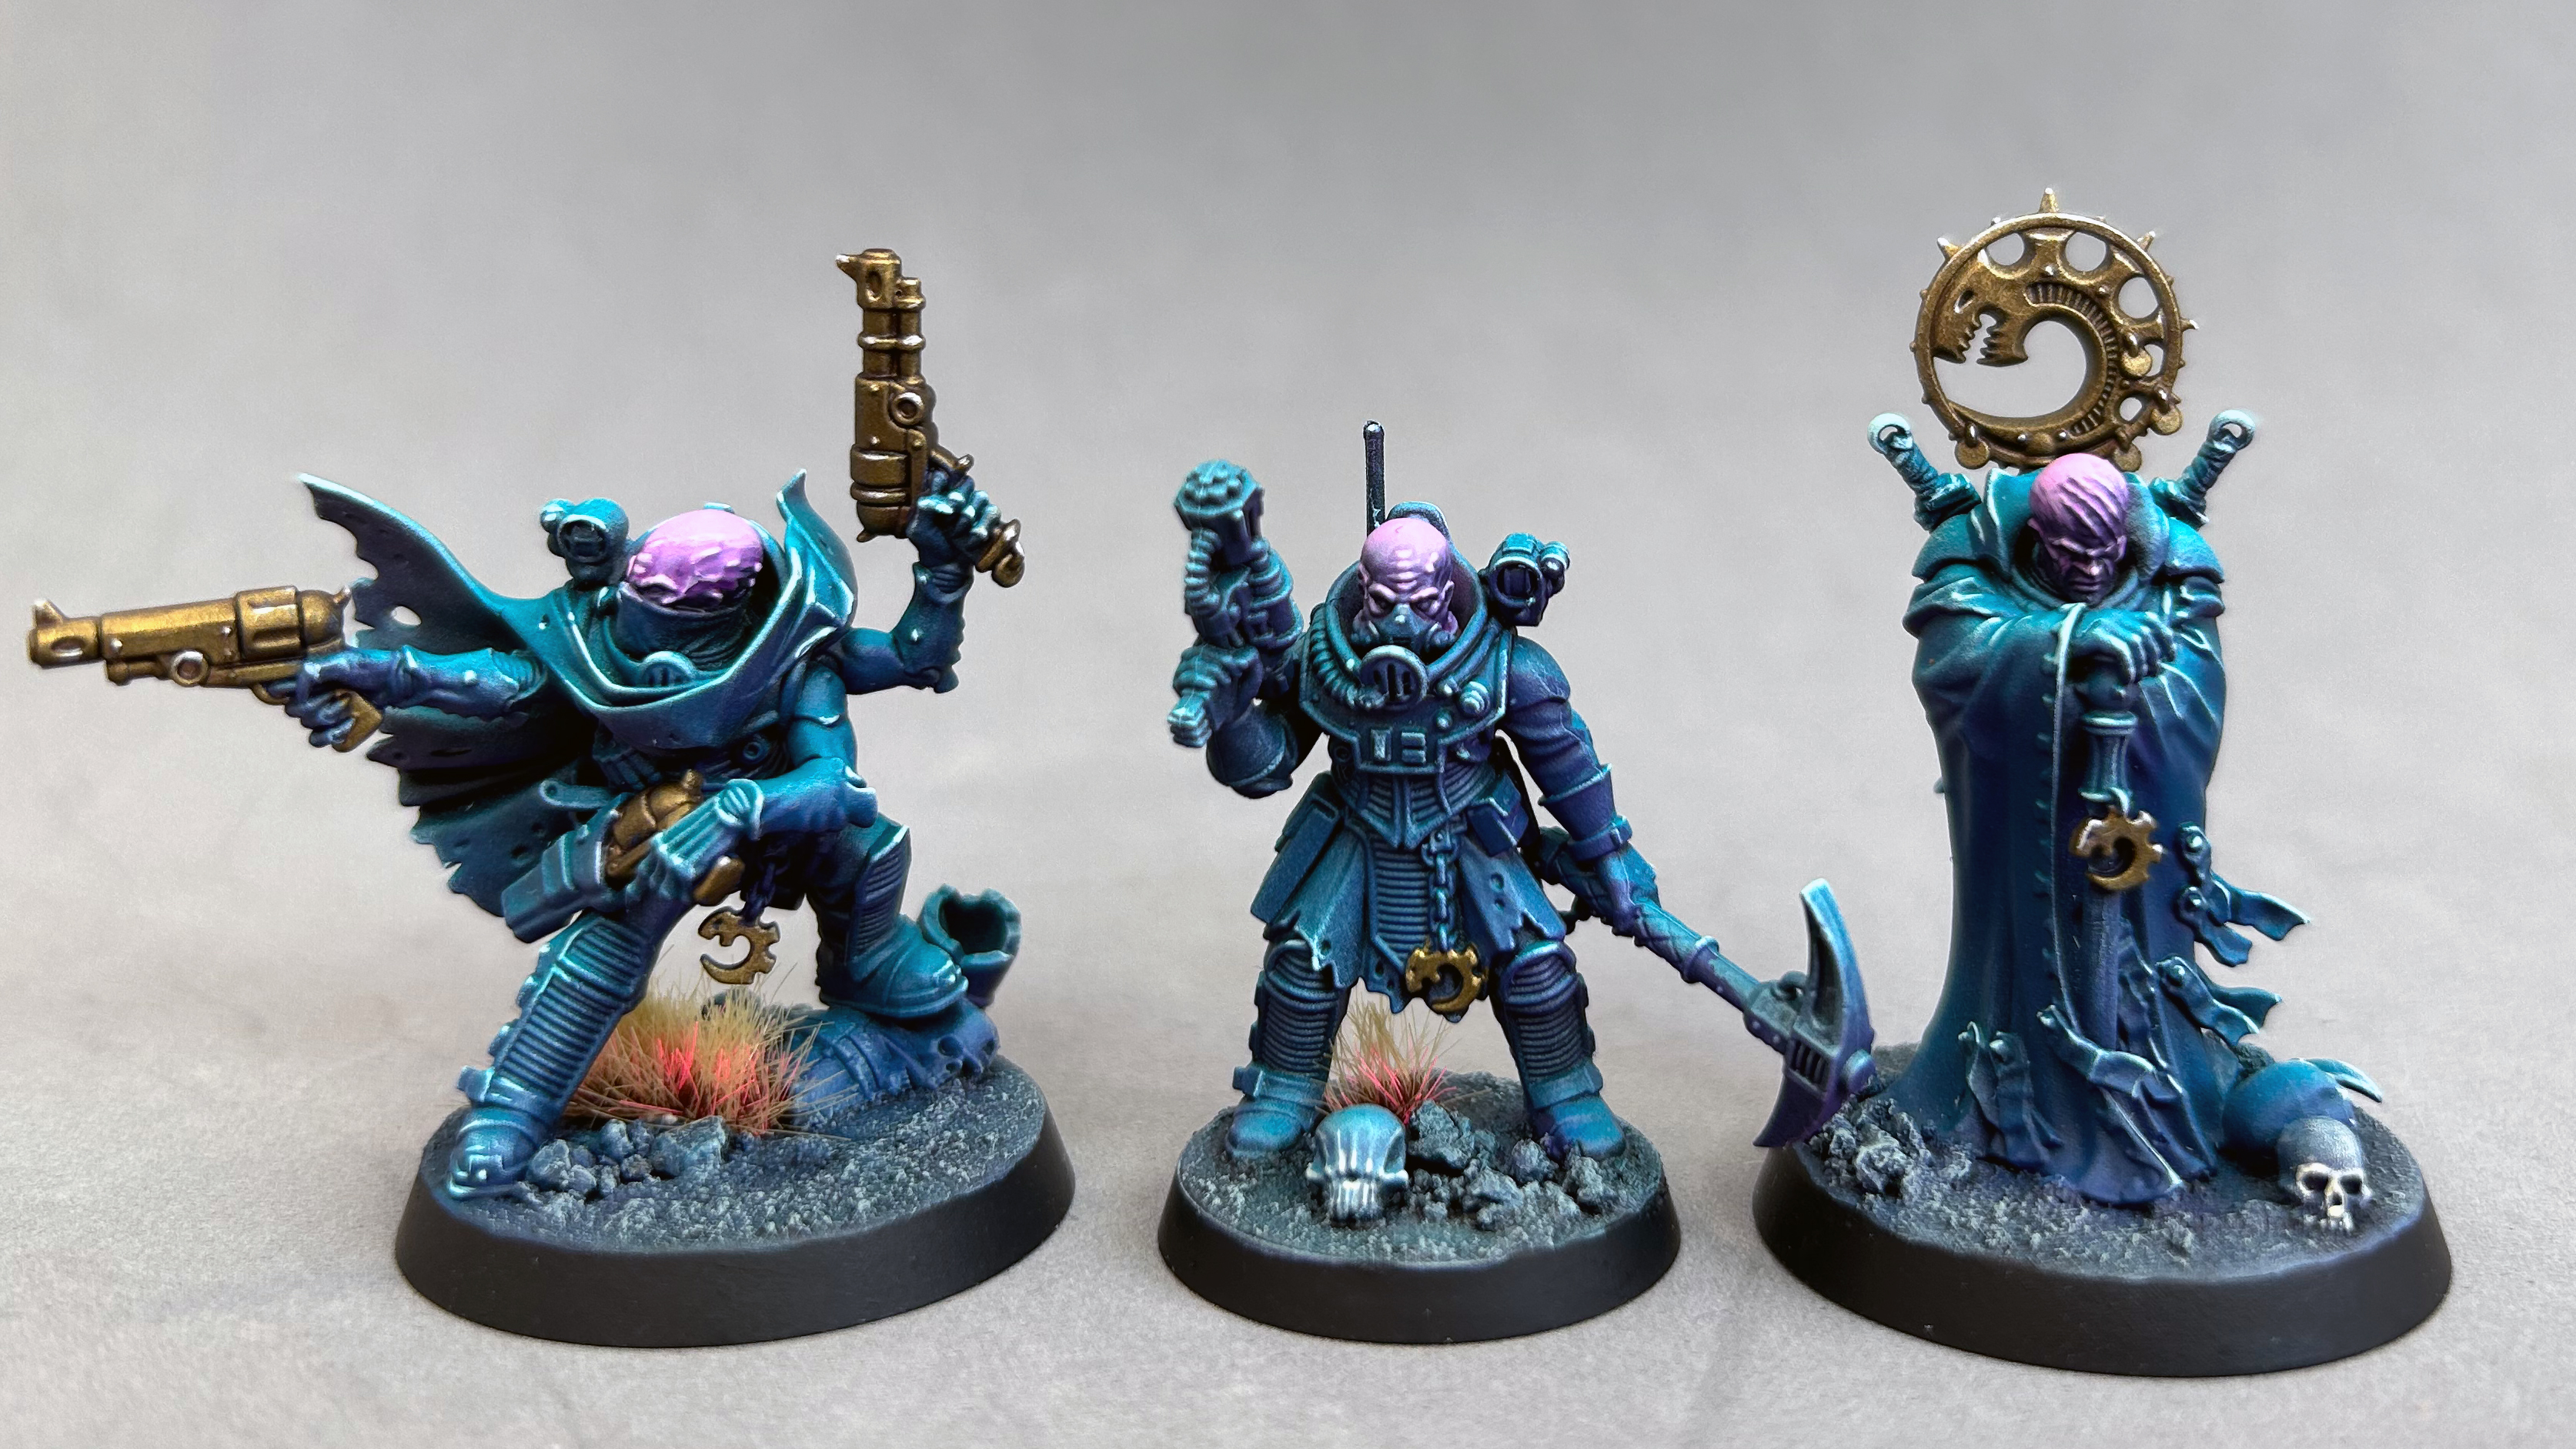
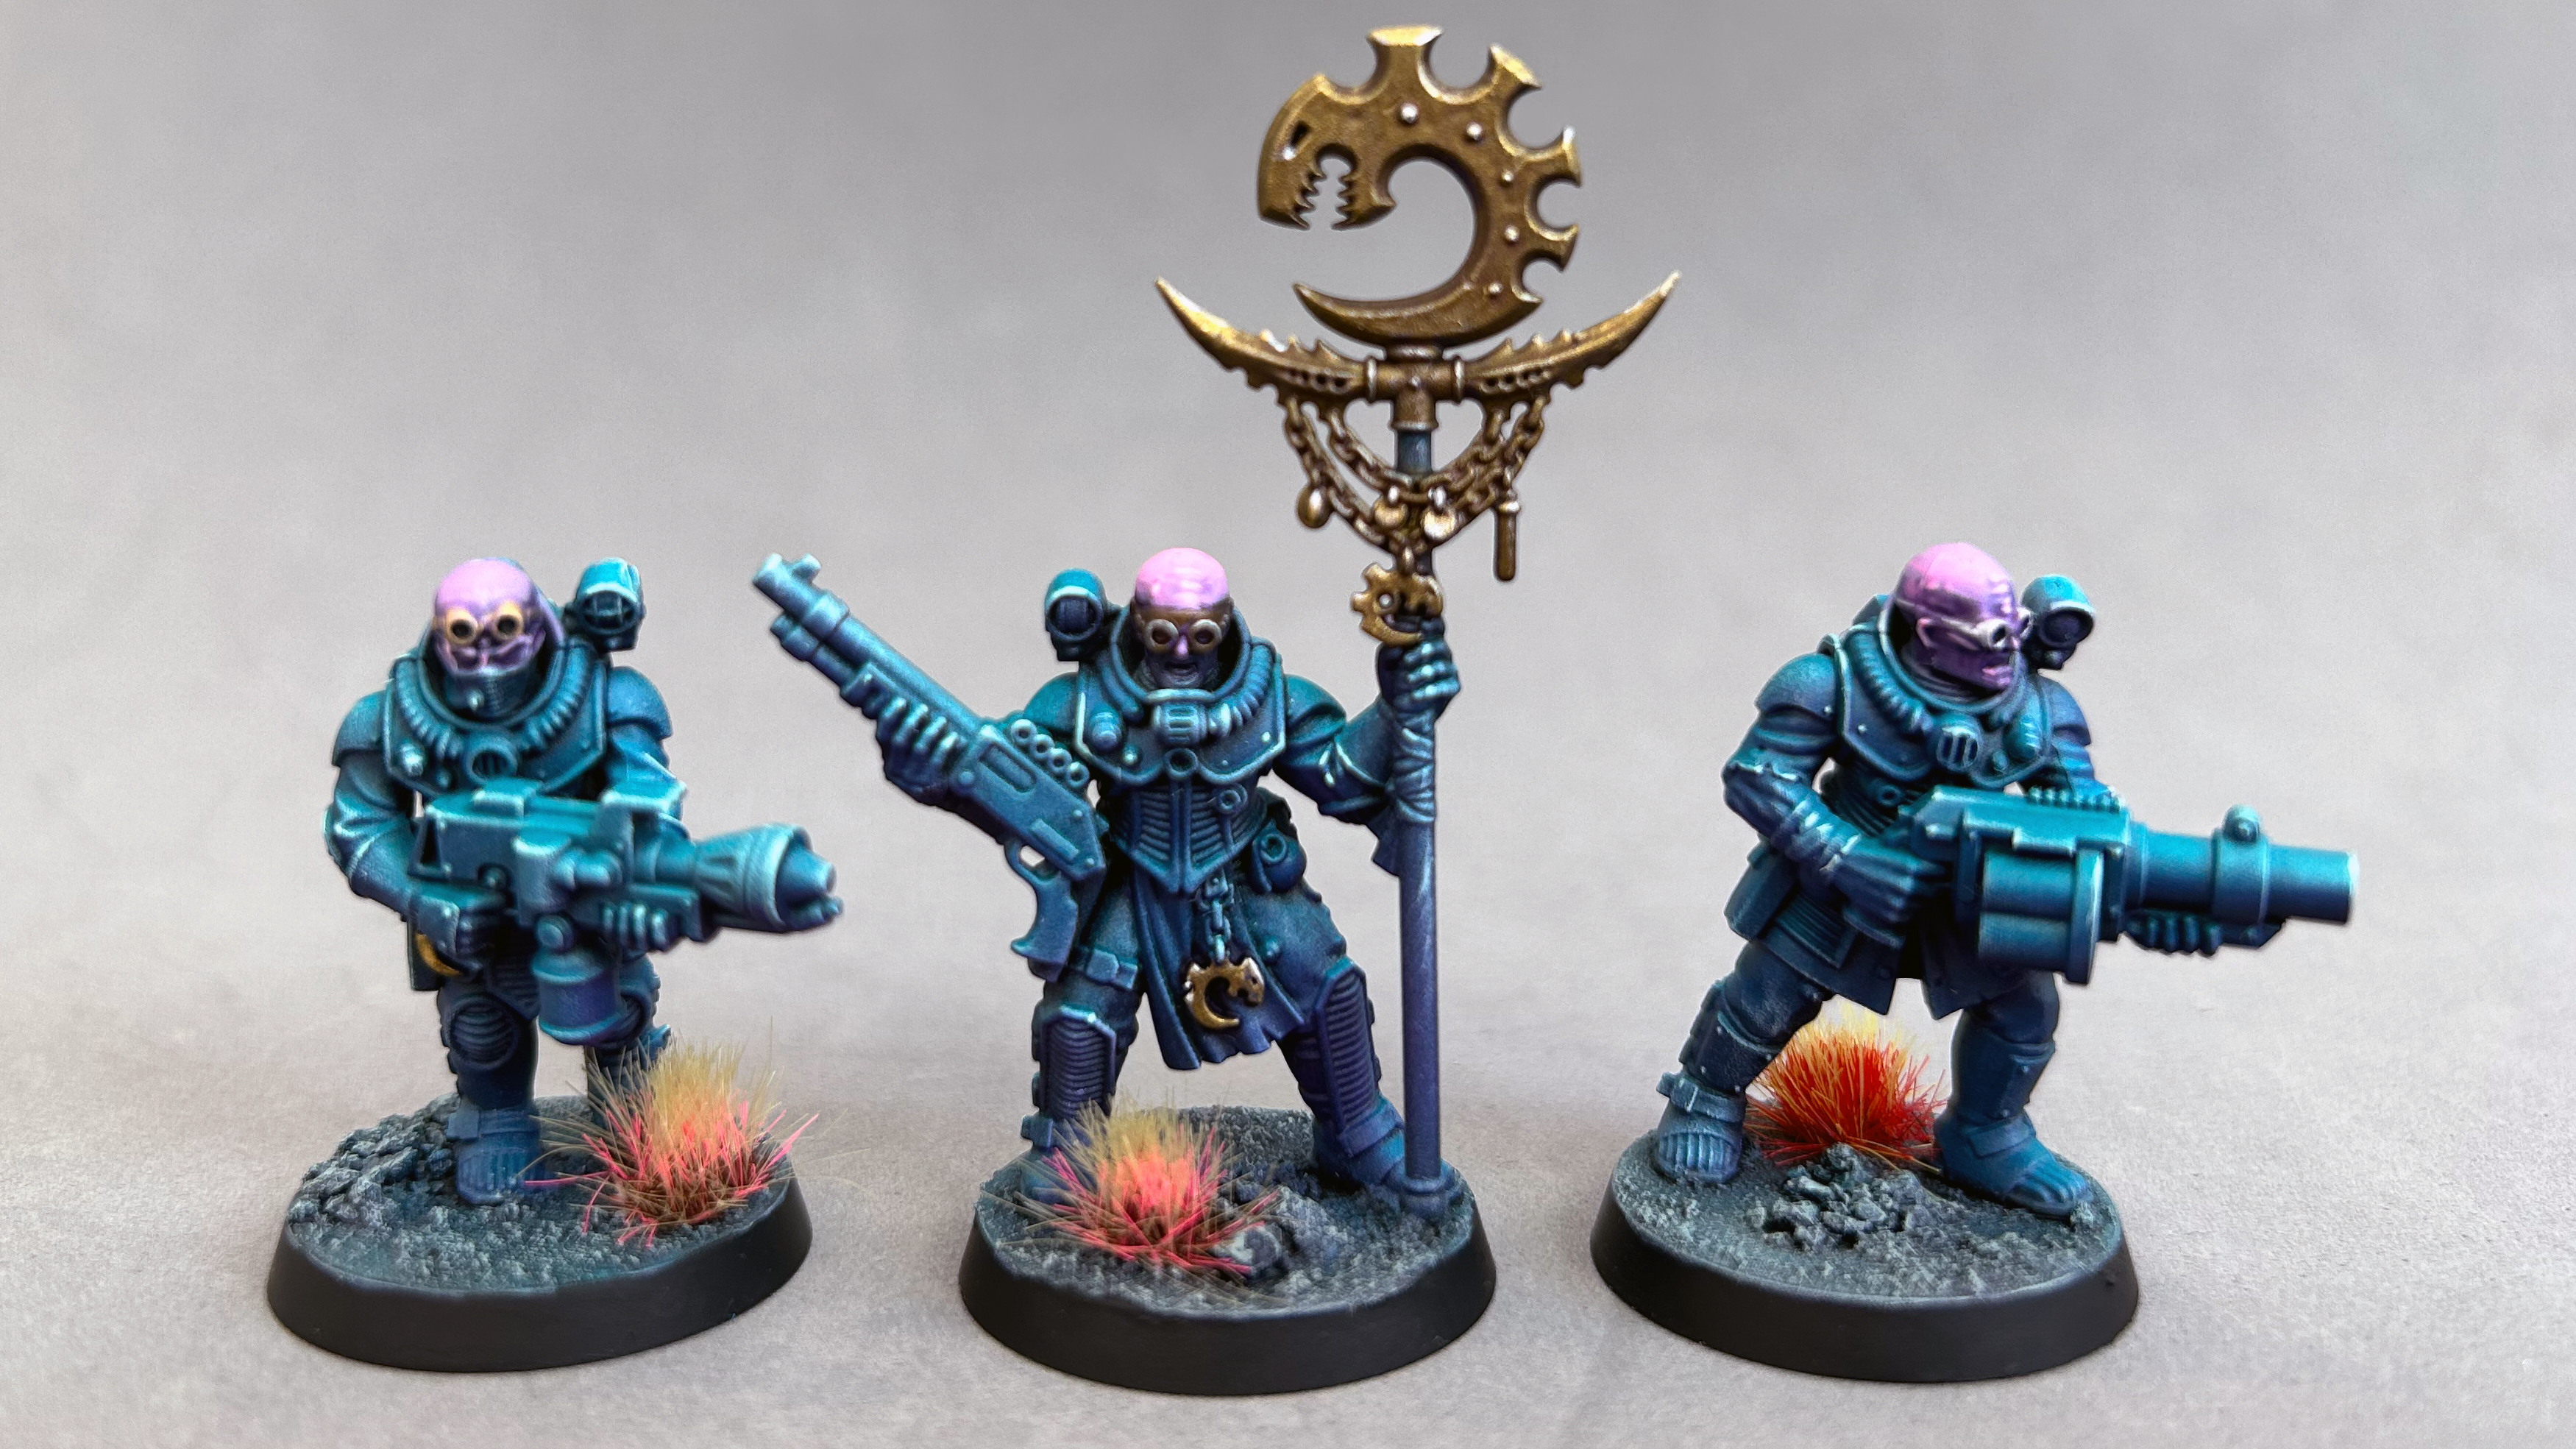
This Genestealer Cult Wyrmblade Kill Team (feat. Kelermorph and Locus) took just over three days on and off painting to be completed, and frankly I love them. The secret it turns out, is under painting.
If you’ve been anywhere near Youtube mini painters lately you’ll have heard of ‘slap chop’ (look it up) and really all I have done is essentially, airbrush slap chop. I undercoat the model black, followed with a grey and then white zentihal highlight before finally dry brushing white over just the model’s edges. This is a really quick way of defining the model’s colour values with an overhead light source.
Once the values are done, I apply hues to the models via a very thin mix of paint 1:4 thinner. Glazes, essentially. For this unit, that meant firstly Xereus Purple from the bottom up (nadir) followed by Aethermatic Blue a GW Contrast colour from the zenith.
Because the airbrush lets you apply paint so sparingly and evenly, the transition between the turquoise and purple is so, so, smooth. It’s bordering on magical!
I masked off the heads and did them with a similar method, separately. I did a dry brush with pastel green over the model with a very, very unloaded brush to make sure just the very tips of the raised areas got covered, and then went over a few edges on each mini to add a bit of pop. That left just the gold areas, which I painted conventionally and that was it!
As much as this is my own method, Dana Howl’s underpainting and airbrush glazing videos are its undoubted genesis. Links at the bottom. They’re great!
I’m really excited to explore this way of painting further, it’s so fast and can deliver beautiful, vibrant miniatures that I’m proud to field on the table top.
The Kelermorph gun fighter, Neophyte Leader and his Locus bodyguard.
Heavy Gunners with seismic cannon and mining laser.
Gunners with flamer and grenade launch flank the team’s icon bearer.
Neophytes with shotguns and auto-guns.
And a shout out to the test models. I’ve found plastic mono-pose models that can be dunked in Dettol time and again invaluable for experimentation. This scheme would never have happened without these Blood Bowl linemen!
Underpainting (all models) Vallejo Black Primer – airbrush VMC French Mirage Blue – airbrush Pro Acryl Titanium White – airbrush
Underpainting dry brush (body) VMC White
Underpainting dry brush (weapons) Scale75 Thrash Metal
Body (mask head prior) GW Xereus Purple 1:4 Vallejo Airbrush Thinner – airbrush (spray upwards from nadir) GW Aethermatic Blue – airbrush (spray down from zenith) AK Pastel Green light drybrush AK Pastel Green spot edge highlight
Head (mask around body prior) VGC Rosa Pulpo (Squid Pink) 1:4 Vallejo Airbrush Thinner (spray down from zenith) GW Druchii Violet 1:1 GW Lahmian Medium tint under areas of head VGC Rosa Pulpo edge GW Fulgrim Pink edge
Gold Detail (mask, insignia) Scale75 Negro Gold base GW Druchii Violet 1:1 GW Lahmian Medium wash Vallejo Airbrush Polished Gold edge Scale75 Speed Metal edge
My mother recently sent me some photos she’d unearthed that my father took of my formative painting efforts that I am fairly sure would have taken place during 1989. In my home town there was one very good bookshop that carried role playing games and one bicycle shop (yes!) that for some reason also sold minis. Whenever we went to to ‘town’ I would visit and stare at all the beautiful blister packs arrayed neatly on a column. It was church for this 14 year old. I pestered my parents to buy me the Warhammer Fantasy Regiments box for my birthday. Sixty minis in one box was just too good for me to pass up, even if they were primitive mono-pose white styrene! They were ideal for a young painter to experiment with, I had a blast and learned a lot. I still have the odd body and head floating around the bits boxes to this day!
Reviewing the photos I can recall that the vast majority of my paints were the screw top Tamiya range, which while still available today are frankly pretty awful for painting minis. The orc flesh is a glossy Park Green mixed with white. Essentially all the materials were poorly suited to the job. The brushes I had were shit, there were no washes, I either lined things black or diluted black paint. the metallics were of mixed consistency and turned grainy when mixed with water. Fourteen year old me didn’t care though – there was nothing better to use, and I loved every minute of it!
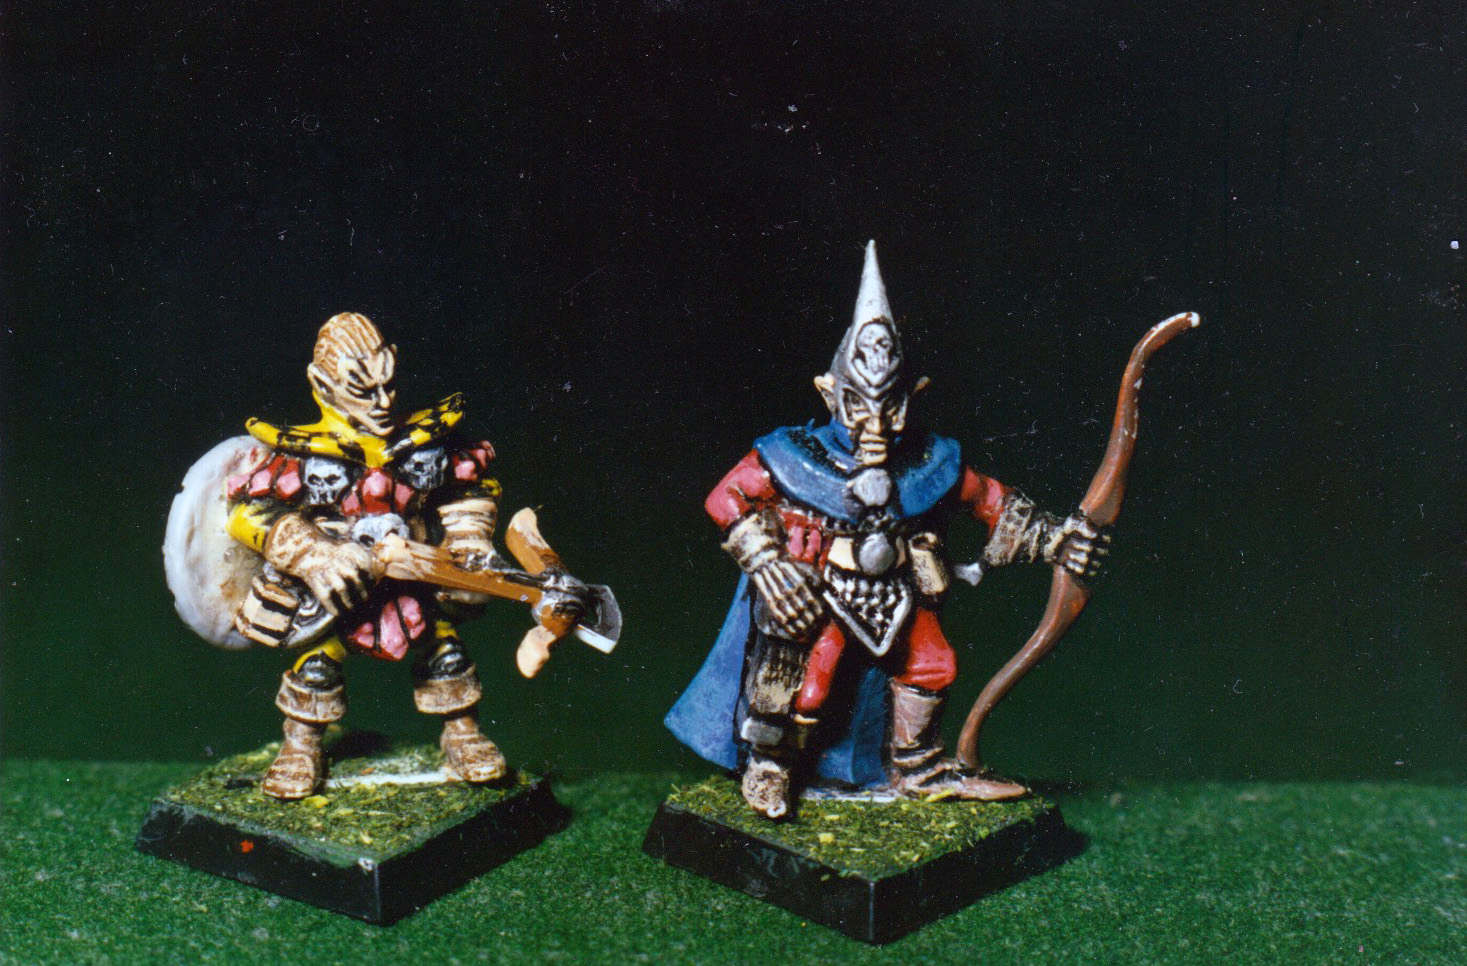
The Dark Elf and Elf from the Fantasy Regiments box. I did also paint the Dwarves but they didn’t make the photo shoot for some reason. Clearly my dislike of Wood Elves runs deep since I glued Dark Elf heads onto them!
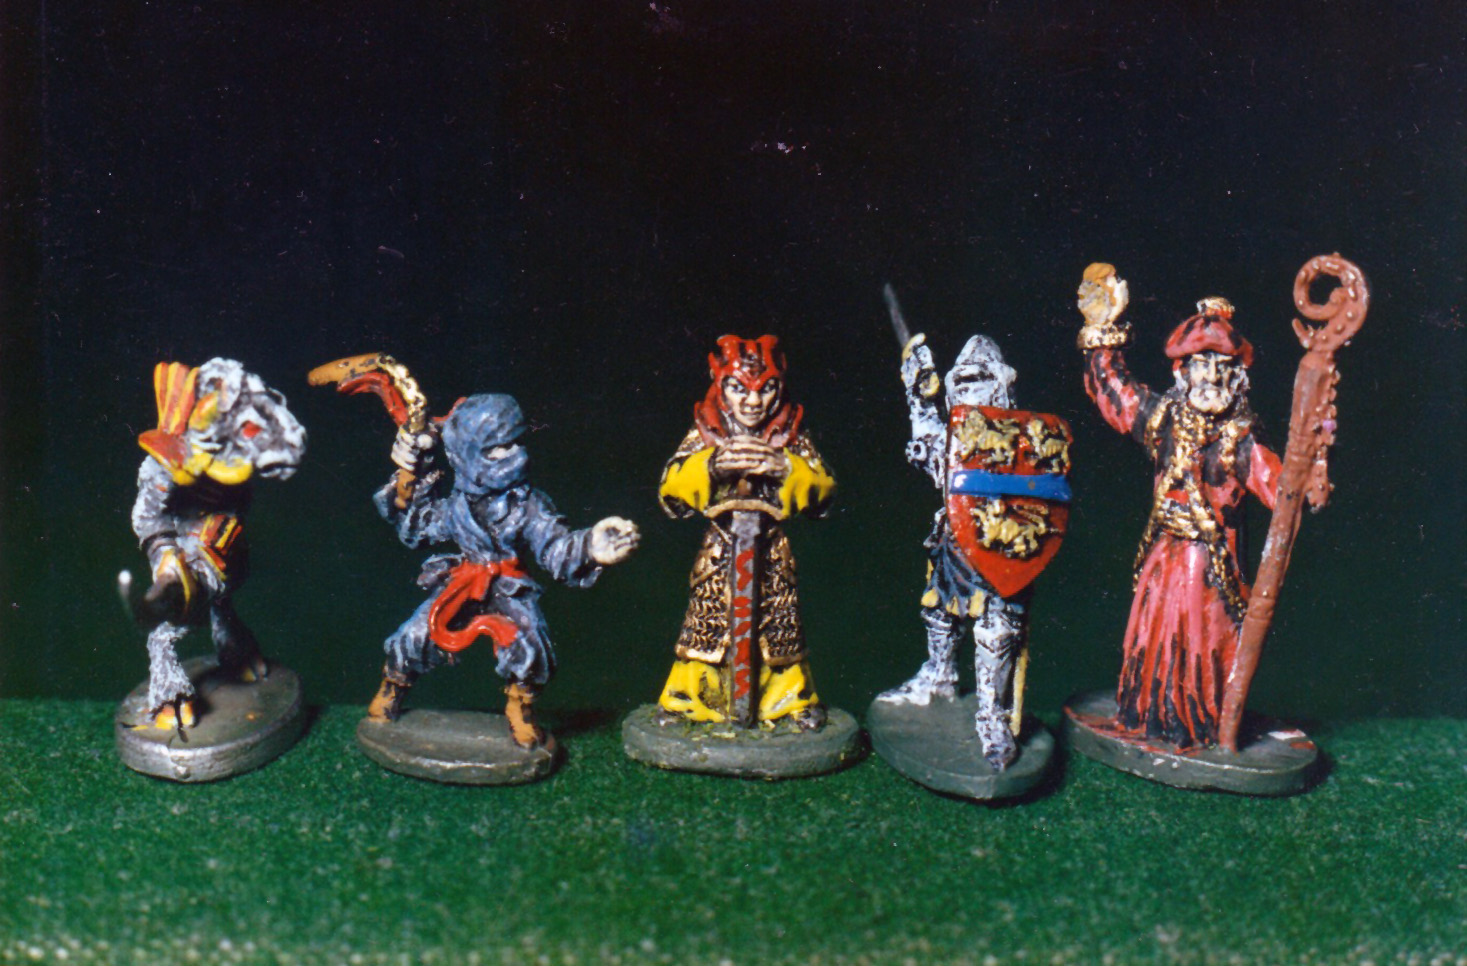
Of course before I found the Citadel minis at the bike shop, I contented myself with 25mm Grenadier Fantasy Lords. The curious ‘scottish’ wizard on the right I have clearly attempted to ‘convert’ into a Chaos Sorceror with black blanchitsu flames.
A Grenadier cyclops and what I think is a titan both coveting the great treasure of ten New Zealand cents. Riches!
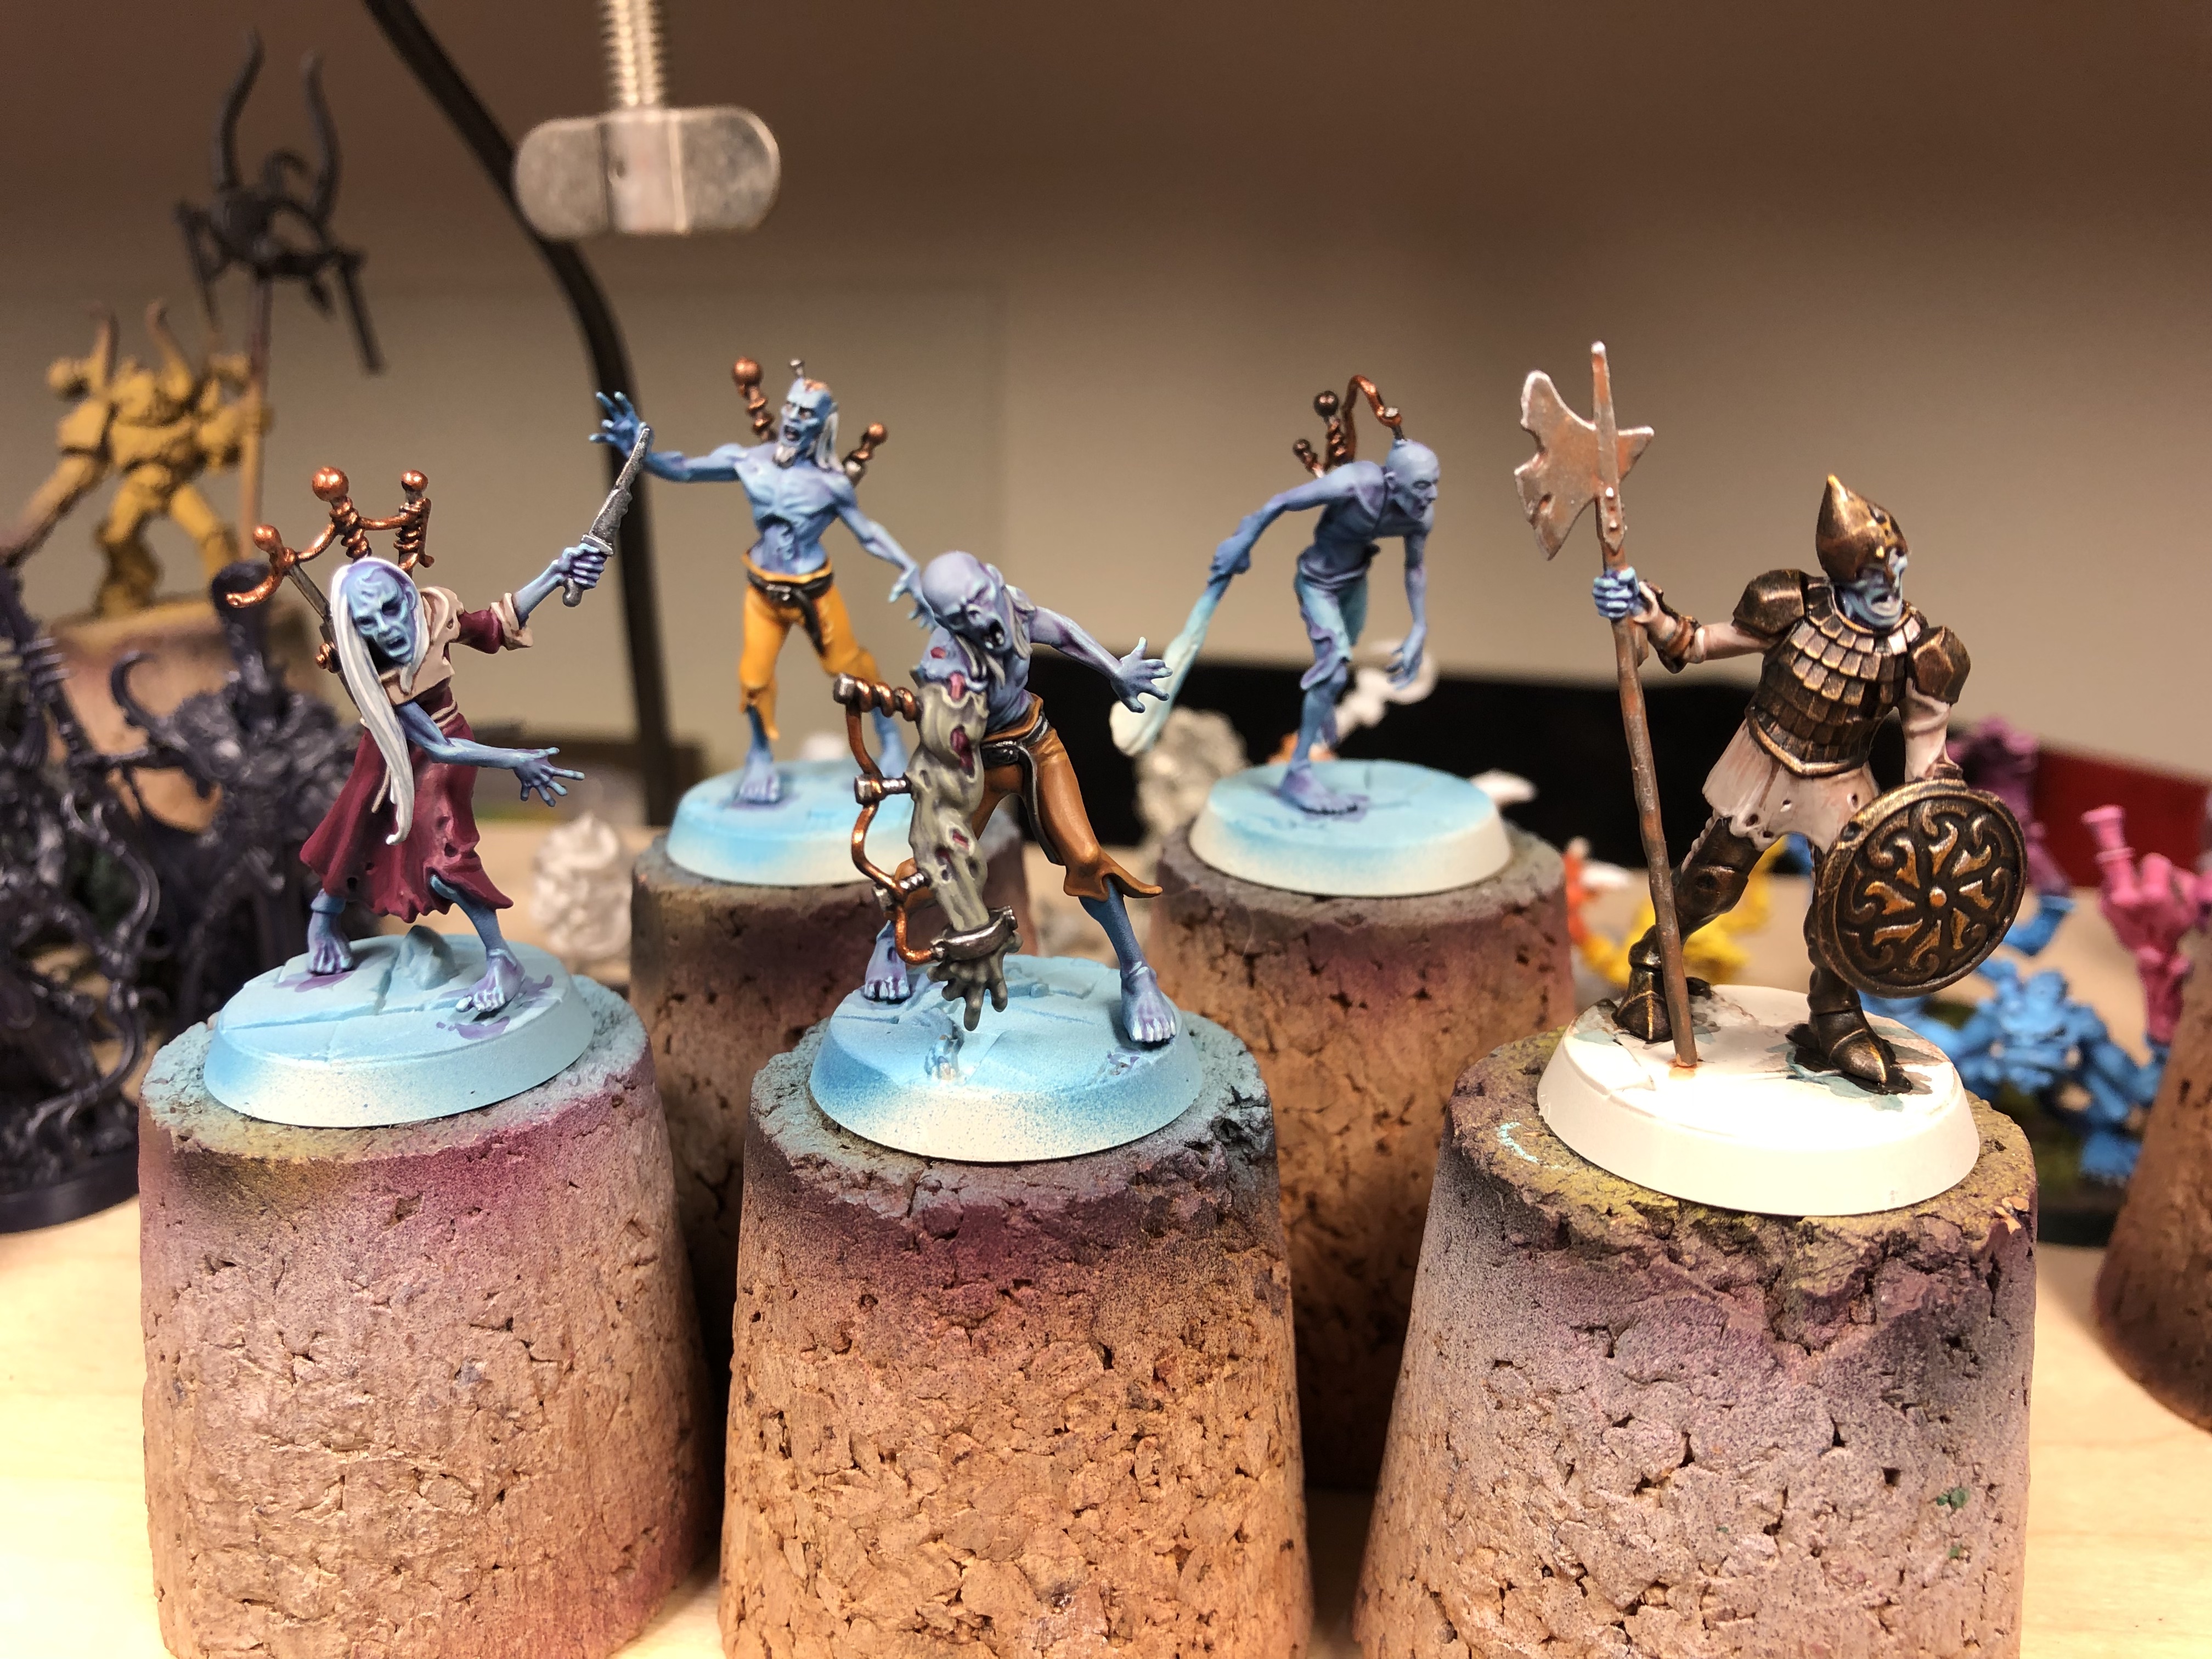
Unfortunately there’s a bit much afternoon sun (ironic considering how miserable the winter has been in these parts) and the pic is a bit glare-y. Nonetheless, the Exiled Dead are done and I’m pretty happy with them overall. As I’ve previously noted they’re interesting mechanically for Underworlds so I’m happy to have them in my ‘done’ corner.
I’ve actually had a tilt with them in Warcry as well, where the fighter cards came as part of a recent White Dwarf (477?) and to be honest Deintalos’ staff was at least in the game I played – overpowered. Two attacks at ST6 doing 3/6 damage was bonkers even if it only has a 7″ range.
I’ve previously covered the recipes for the zombies, I took a photo to document the colours I used to airbrush Ming the Merciless’ Deintalos’ red robe/lab coat. It actually doesn’t look especially impressive (crap photography strikes again) – but it was just a darkened Khorne Red, followed by a zenith layer of Flat Red. I did some lining with Reikland Fleshshade before adding some edges with Wild Rider Red.
And that’s it. Next up is the long-stalled Morgok’s Krushas.
It’s been almost two years since I last picked up a brush and painted a mini from start to finish. Bault here is from the Underworld’s Exiled Dead war band which was released fairly recently. Somewhat ironically these lurching undead are by and large very plain and not physically inspiring – yet they’re the outfit through lore and mechanical integration that have nonetheless inspired me to end the drought.
Turns out it’s like riding a bike.
“I know you’re up there Lisa, I can smell your brains”